Introduction
Context API can solve many problems that modern applications face, related to state management, for example, props drilling. Many solutions can solve state management issues and props drilling, but they may increase your build size and compromise your app performance. Context API is a React built-in feature, so we don’t have to worry about performance overhead and library installing issues.
The props drilling problem occurs when you pass a prop somewhere down the tree. When a project grows, data passing through props becomes chaotic, making the code more vulnerable and complex. To tackle this problem, we use Context API.
Note: Many other state management libraries are also available, but we will see them in another blog.
Leverage Context API for Seamless Mobile App Development!
Ready to harness the power of Context API for your mobile app development projects? Partner with AlphaBOLD's expert team to integrate robust API solutions into your apps.
Request a DemoHere are a Few Benefits of Context API that Give it an Edge:
- The Context API helps share data between components which you can’t easily share with props, for example, complex data objects.
- React Context API provides a way to send data like userid, auth, and theme data through the component tree without sending any props manually at every level.
- We can also share specific states with multiple components instead through props manually. In some use cases, ideal for theming, localization, authentication etc.
Further Reading: Custom Web Application Development: A Complete Guide for C-Suite
Implementing Context API in a React Application
Let’s dive into an actual project to understand more about Context API.
Project Setup:
Create a new react project and name it accordingly. I named it “Context-API.”
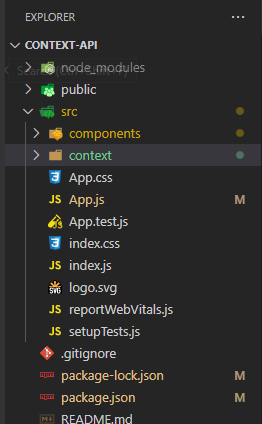
Add some directories for components and context modules arrangement. It is not mandatory but helps you categorize your project modules.

Add a module in your context directory with the name of “AuthContext.”
React.createContext(default Value)
React.createContext() function is responsible to create and return context object with default values or empty values. You can also use Object in default values as shown below:
React.createContext({
Field1:’value1’,
Field2:’value2’,
Field3:’value3’,
Field4:’value4’,
})
const AuthContext= React.createContext({
isLoggedIn: false,
setLoggedIn:()=> {}
});
You can also catch the createContext returned object and export it as default.
Let’s create some basic components for demo project and add some components module in “components” directory.

Add Login component with this simple login input code.

Add dashboard component in components directory with H1 tag.

The most important component is Navigation which will control the navigation of application. It’s not mandatory to add it but this will help you categorize and arrange your code in a much better and professional way.
Import your modules navigations “Dashboard “and “Login.”.

Remove all the code from your default “App.js” except “header” and top “div.”.
Import “Navigation” component and add it under the header tag.
Now let’s run your project with “ npm start” in terminal.


So, our basic project is now setup let’s dive into the implementation of Context API.
Import “AuthContext” in “App.js.”
import AuthContext from ‘./context/AuthContext‘
Also, create a state for auth.
const [auth, setAuth]=useState(false)
There are some other concepts we should understand before continuing.
1. Provider:
- The Provider component helps wrap the components which have access to our context.
- The Provider component receives a prop called “value,”, which can be accessed from all the components wrapped inside the Provider.
<AuthContext.Provider value={{}}>
- Value attribute gets default values for the Provider.
<AuthContext.Provider value={
{
isLoggedIn: false,
}}>
2. Consumer:
- After wrapping all the components that need access to context with the Provider component, you should tell which component is going to consume that data.
- The Consumer component allows a component to subscribe to context changes. The consumer components allow to use data from the context.
<AuthContext.Consumer>
{(ctx) => {
return <component value={ctx.auth}>
</ component >
}}
</AuthContext.Consumer>
3. Dynamic Context:
- The function that allows consumers to update the context in our case “setLoggedIn” function, is a context updater that will update our context according to the given value.
<AuthContext.Provider value= {{
isLoggedIn: auth,
setLoggedIn:(value) => {
setAuth(value)
}
}}>
Let’s add a Consumer in Navigation, wrap all components, and return to render components. The consumer function will give us access to the context state to navigate according to the state. We used context isLoggedIn state to authenticate whether the user is Logged in or not. The Navigation will return the Dashboard page, if a user is logged in, and if not, it will return the Login page.
return <AuthContext.Consumer>
//Context function
//context function will return context object which you can use
{(ctx) => {
return <div>
//Context state
{ctx.isLoggedIn && <Dashboard />}
{!ctx.isLoggedIn && <Login />
}
</div>
}}
</AuthContext.Consumer>

We added a consumer in Navigation to control the page navigation according to the state change. So, let’s update the context state using Dynamic Context.
Remember we added a “setLoggedIn” function in our context object.? This is responsible for updating the state of the context object. We added another consumer in “Login.js” to update the auth state. We implemented a context function to use and update the auth login state.
<form onSubmit={()=>{
ctx.setLoggedIn(true)
}}>
We will add a function on the submits of the Form. We have updated the state of context by setting the “setLoggedIn” value to “true” in this function.

useContext:
Let’s talk about another valuable feature of context API. It will give a better look and minimize your code. We can use “useContext” instead of Consumer.
import React,{useContext} from “react”
import AuthContext from “../context/AuthContext”;
const ctx=useContext(AuthContext)
return <div>
{ctx.isLoggedIn && <Dashboard />}
{!ctx.isLoggedIn && <Login />
}
</div>

Use Cases of Context API (Real world applications of Context API)
1. Authentication:
The most common use case of context API is we can authenticate the user and control the navigation according to the auth response, as we did in this blog.
2. Theming:
We can customize the theme of our app on a specific page. Let’s assume we have to design an app that should have a dark and light mode. We want to change the theme of the app according to the user need to use theming objects, e.g., mode, color and in context state. These all-context states can be used in any view or page where we want to change the theme.
3. Responsiveness:
If we are designing an app that is super responsive on every device, mobile, tab, and large screens, then we will detect the device screen size and orientation, save the screen state in the context object. When the device screen context is available to all components, we can adjust them according to the screen state.
4. User Profile Management:
Most of the apps are based on user personal account management, and their most important feature is user profile management. We can store the user data in the context state when using the context API in our app.
{
userName:””,
uid:””,
email:””,
admin:
}
Suppose we store this context in our app. In that case, we can use it in the whole app, especially when saving the user logs and history, like use cases or users posting something or commenting on the post. We can find out which user is posting using their “uid” context.
Context API vs useContext
Context API:
The Context API is the React feature used for solving props drilling problems. We have already discussed props drilling in the above section. In Context API, we give data access to a component tree at the start to end level instead of using props.
useContext:
The useContext is the React hook, used in context API to consume the context state or object. There are two options for getting the context object. We can get the context object from Context Consumer or UseContext Hook. UseContext Hook is an exquisite, more excellent way to get the context object with less code.
Context API Integration: Your Key to Mobile App Success!
Looking to boost the performance and functionality of your mobile apps? Explore Context API integration with AlphaBOLD's mobile app development services.
Request a DemoAdvantages and Disadvantages of Context API
Advantages:
- React built-in feature
- Easy to implement
- No overhead or performance compromise
- Props drilling problem solution
Disadvantage:
- Not a suitable option for large projects.
- Automatically re-renders components when the context state changes
Conclusion
This blog discussed Context API and its various aspects. Here is what we talked about:
- Implementation of Context API
- Provider and Consumer in Context API
- Use of Dynamic Context to update the state of the context
- How to minimize the code using useContext Hooks
- Practical application of Context API
- Pros and cons of Context API
Hope this blog helped you understand the different dynamics of Context API. We will discuss some other options for state management, like Redux, in another blog.
Explore Recent Blog Posts


