Things you did not know …?
If you are a NetSuite user, there is no chance that you haven’t encountered NetSuite Saved Searches and tried to manipulate them. This powerful tool has many neat capabilities and it can be used in ways that are not always transparent. In this blog I will touch on one tool and two tricks that will enhance your knowledge of Saved Searches. Note, this article is meant for intermediate to advanced users of NetSuite.
Records Browser
I frequently refer to the Records Browser as ‘NetSuite’s Bible’. The Records Browser is neither holy nor do I intend on turning this blog into a religious discussion. That being said, this tool is an ‘Alpha and Omega’ when it comes to understanding of NetSuite’s data objects, records and their relationships with each other. It’s immensely helpful when you are building Saved Search formulas or when you are simply struggling to find a field in NetSuite’s Saved Search interface.
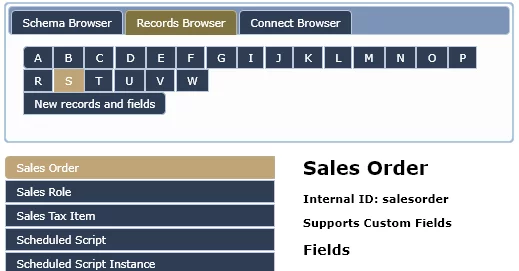
- Firstly, notice the letter index at the top. All records are indexed by their name for easy lookup. Let’s say you want to inspect a Sales Order transaction record. Please click on a letter ‘S’ within the index section, next click on the Sales Order tab to the left.
- Every page in the Records Browser will show the following:
a) All the header / body fields
Here, you will find the ‘Label’ column very useful as you can easily look-up a field on this page which isn’t the case when it comes to NetSuite UI’s drop-downs.
Also, when you are building SQL formulas by using the formula fields it is useful to know the internal id’s of NetSuite fields. Records Browser exposes these in the first column (see screenshot above).
b) Sublist fields
If you continue scrolling down, Records Browser will display all the available sublists and their column fields.
c) Joins, Filters and Columns
Now comes the interesting part. Previous two points (a & b) deal with fields that are exposed and supported on the record. Not all of these fields can be selected in Saved Search’s criteria and results tabs. Before I get to this, let me explain three important elements of NetSuite’s Saved Searches.
Joins
Let us take a second to explain what joins are. The following is a boring definition from Wikipedia. Join is an operation that ‘combines columns from one or more tables in a relational database‘.
In translation, when I am looking up a transaction via a Saved Search, an example of ‘join’ would be a field from the Customer record that I would want to expose as a column on my Saved Search results screen.
Joins (records that are linked to the object that you are looking up through the Saved Search interface) are always at the bottom of the Saved Search’s drop-downs and they can be recognized by a 3-dotted suffix (‘…’).
Now that we understand what ‘joins’ are, let us take a look where we can find them in the ‘Records Browser’. In our previous example, Sales Order is just a type of transaction in NetSuite. Consequently, by scrolling all the way to the bottom of this screen
… and by clicking on (Transaction)
… we can see all the records that are linked to transactions (also called joins).
Filters (Saved Search Criteria)
As mentioned above, not all fields can be looked up in NetSuite or can they be used as criteria. The ones that are available are listed on this page.
Remember, ‘filters’ is the criteria tab of your Saved Search interface
Columns (Saved Search Results)
On the same Records Browser page, keep on scrolling.
These are the fields that are available under the Results tab of NetSuite’s Saved Search interface.
To conclude, mastering Records Browser and learning how to navigate it will help you build amazing Saved Searches. Stay tuned for the second part of this blog where I will walk you through two Saved Search tricks that will demonstrate how powerful Saved Searches can be.
If you have any question or queries, do not hesitate to reach out to us!


