Table of Contents
Introduction
Considering the evolving business landscape of 2025, the key to scaling successfully isn’t just about doing more, it’s about doing things smarter. For C-level leaders like yourself, the bottom line is clear: how do we deliver better projects faster, with less cost, and more visibility? The answer is Dynamics 365 Project Service Automation (PSA).
If you haven’t fully tapped into the power of Dynamics 365 PSA, now is the time. Project Service Automation is a Microsoft business application that helps with project automation. From streamlining processes to improving resource allocation, PSA Project Management can shift your entire approach to project delivery, helping you stay ahead of competitors and drive sustained business growth.
In this blog, we will break down how to leverage Dynamics 365 PSA to take control of your projects from start to finish so that you can ensure top-tier results every time.
Why Dynamics 365 PSA Is a Must-Have in 2025
Project Service Automation in Dynamics 365 gives your organization the ability to automate and streamline workflows across multiple regions, teams, and time zones. It isn’t just about improving efficiency; it’s about unlocking value across every project you run. Whether you’re dealing with complex multi-region projects or managing smaller-scale initiatives, PSA Project Management is the key to ensuring that everything flows seamlessly.
For C-level executives, this is a no-brainer. You need to measure ROI, track KPIs, and ensure that your teams are performing at peak levels. Dynamics 365 Project Service Automation helps you do all of this—and more—by providing:
- End-to-End Project Visibility: Get real-time insights into project progress, budgets, and timelines.
- Optimized Resource Allocation: Ensure the right people with the right skills are deployed to the right tasks, driving efficiency.
- Improved Profitability: Track costs and revenue accurately, optimizing both project margins and invoicing.
See D365 Project Operations in Action
If you’re looking for a solution that scales with your business and adapts to your unique needs, Dynamics 365 PSA is your go-to tool. Our experts can help you leverage the platform at 100% capacity.
Request a DemoSetting Up Project Service Automation in Dynamics 365:
If you’re looking to optimize your Project Service Automation (PSA) in Dynamics 365, getting the setup right from the beginning is crucial for ensuring streamlined operations and maximizing efficiency. Below, we break down the essential steps to help you set up Dynamics 365 Project Service Automation and avoid common pitfalls. Follow these steps to configure PSA Project Management effectively.
Create Organization Units in Dynamics 365 PSA
As you begin setting up Project Service Automation in Dynamics 365, one of the most important steps is to configure organization units. These units allow you to associate roles with specific pricelists based on different geographical regions, currencies, or teams.
- For my example, I’m setting up PSA for a consulting firm with offices in the US, Australia, and UK.
- I’ve created four organization units—one for each office, each with its respective currency.
The setup for organization units is covered in the guide, so we won’t dive into details here, but ensure you’re clear on the concept before moving forward.
Set Up Cost Pricelists
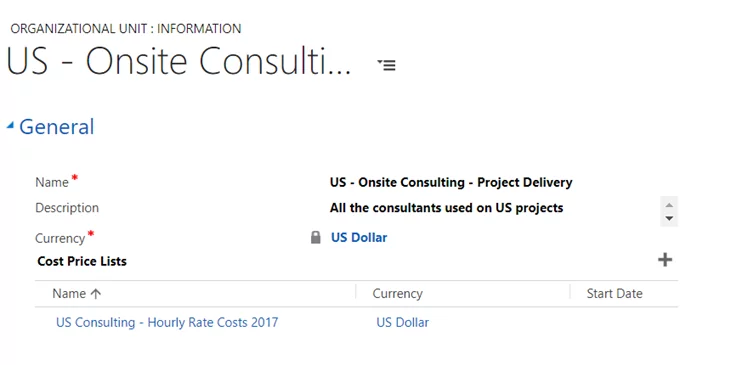
Next, you’ll need to configure cost pricelists. These are critical for calculating the project cost vs revenue during both the estimation and execution stages of your projects.
- In my setup, I have three cost pricelists—one for each office (US, UK, and Australia).
- Each organization unit will be associated with its respective cost pricelist.
- Don’t forget that offshore resources will need to be part of the pricelist too. They contribute to the overall cost structure for projects in these territories.
In Dynamics 365 PSA, the currency is defined at the organizational unit level, ensuring that all projects in that unit adhere to the same currency.
Simplify Project Management with Dynamics 365
Get expert insights on setting up Dynamics 365 Project Service Automation. Optimize project tracking, cost estimation, and invoicing.
Get our Expert HelpDefine Multiple Pricelists for Your Roles
Now that the foundation is set with organization units and cost pricelists, the next step is associating roles with specific pricelists. Here’s where the magic happens:
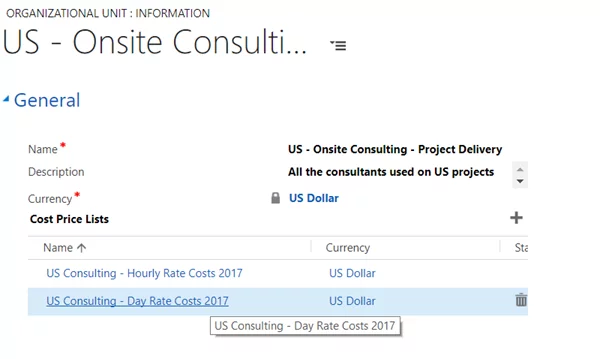
- You can associate multiple cost pricelists with a single organization.
- For example, I have associated two pricelists for the US organization unit: one for hourly costs and another for daily costs.
By doing this, you can track your costs more accurately and provide your project teams with better tools for estimating expenses and resources.
- Each organization unit will be associated with its respective cost pricelist.
- Don’t forget that offshore resources will need to be part of the pricelist too. They contribute to the overall cost structure for projects in these territories.
Open and Review the Pricelist in Dynamics 365 PSA
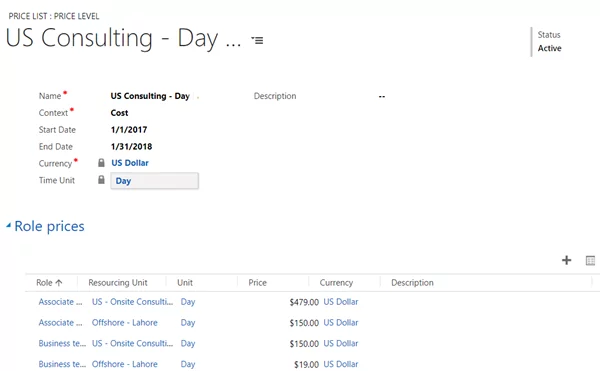
Once your pricelists are associated, open them to verify the details. Here’s what you should look for:
- Context Field: Each pricelist has a “context” field that specifies whether the pricelist is for sales, purchase, or cost purposes.
- Unit Pricing: The unit (e.g., hourly or daily) is defined at the pricelist level and cannot be changed at the item level. If you require hourly pricing, you will need to create a new pricelist specifically for that.
Efficiently Add Pricelist Items (Role Price)
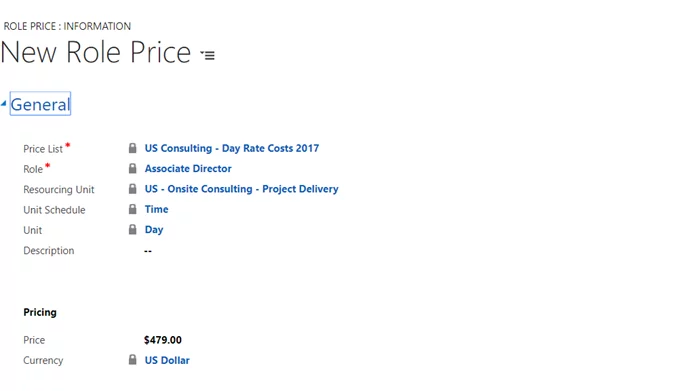
As you move forward with setting up PSA Project Management, one of the most tedious tasks is creating the individual role prices for each resource. These role prices define the cost associated with each role, resourcing unit, and pricelist.
- In Dynamics 365 PSA, Role Price items are essential for grouping roles with their respective costs.
- It can be very time-consuming to manually input all the roles and role prices. Pro Tip: Use Excel import to expedite this process. I learned this the hard way after spending hours uploading data manually. I had around 10 roles to configure, and importing via Excel saved me countless hours.
Once you’ve imported your data, verify that all role prices have been set correctly.
You may also like: Why Growing Businesses Switch to Dynamics 365 for Project Operations?
Finalizing Your Setup: Test and Adjust
With your organization units, cost pricelists, and role prices now in place, the final step is to thoroughly test your setup. Run a few sample projects through the system to ensure that the cost estimations, resource allocations, and invoicing are working as expected.
- Test for accuracy in project cost tracking.
- Ensure that the hourly and daily pricing models are being correctly applied.
- Validate that offshore resources are properly accounted for in the overall project cost structure.
If everything checks out, you’re ready to begin managing your projects with Dynamics 365 Project Service Automation at full capacity.
Need Help with Dynamics 365 Project Automation?
AlphaBOLD experts can guide you through setting up PSA, from configuring organization units to generating invoices. Let’s get started!
Get our Expert HelpKey Takeaways
Integrating Project Service Automation into your company’s strategy is no longer optional, it’s essential for staying competitive in today’s fast-paced business world. Whether you’re looking to improve efficiency, increase profitability, or deliver better client results, Dynamics 365 PSA is the key to unlocking a new level of operational excellence.
Take control of your projects, optimize your resources, and see the exact potential of your team with Dynamics 365 Project Service Automation.
Explore Recent Blog Posts
Setting Up Project Service Automation in Dynamics 365:


