

Let’s say we have a Power BI report which contains an organization’s sales data. This dataset contains sales information from all the countries the organization operates in. The organization wants to enable the managers to use the report to track sales targets and overall performance by their respective countries. Hence, it is a requirement that a manager in charge of one country should not be able to see the performance of a manager of another country.
Power BI has a feature called Row Level Security (RLS) to keep data from being exposed to unauthorized users. We can leverage RLS to create roles and assign those roles to specific users in Power BI service.
We will use Contoso Sales public dataset to show you how RLS works.
Dataset Model
We need to consider the dataset model to figure out which table to filter and how it would affect the filtering flow. Creating roles in Power BI is all about writing a DAX expression to filter a table which will filter out specific data for a specific user, hence maintaining privacy.
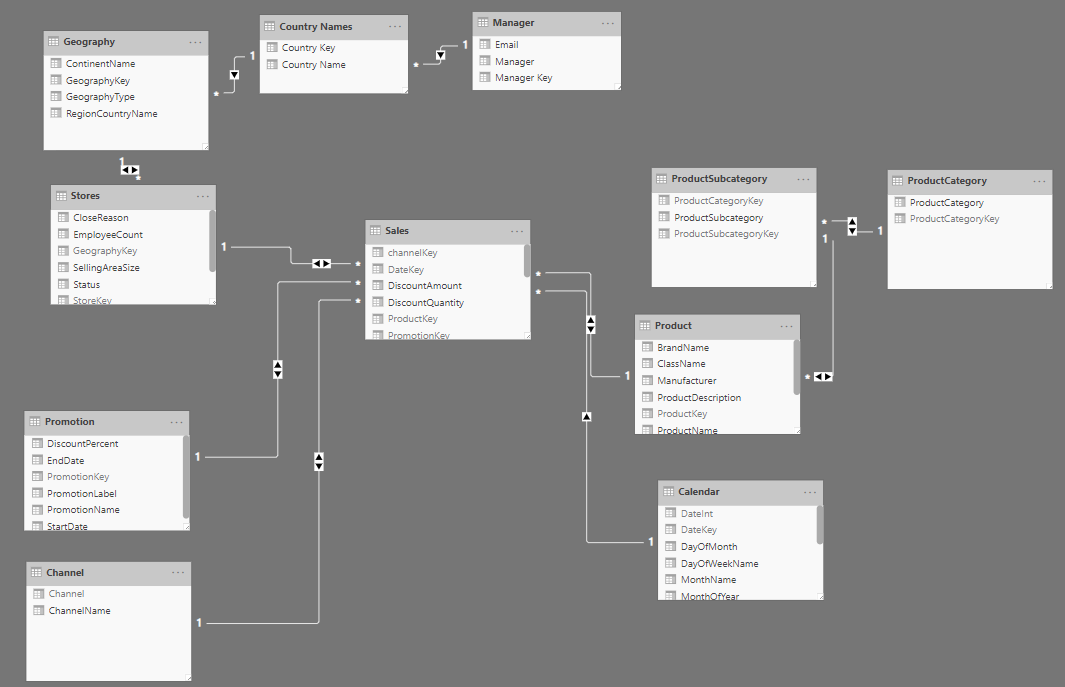
This is the Contoso Sales relationship schema. We have added the Manager table as there was no Manager/User information available in this dataset beforehand. Do note that by filtering the Manager table, we can filter the rest of the Geography and Stores tables, as a result automatically filtering our fact table Sales. What that means is that we can filter geographical sales data for specific managers easily.
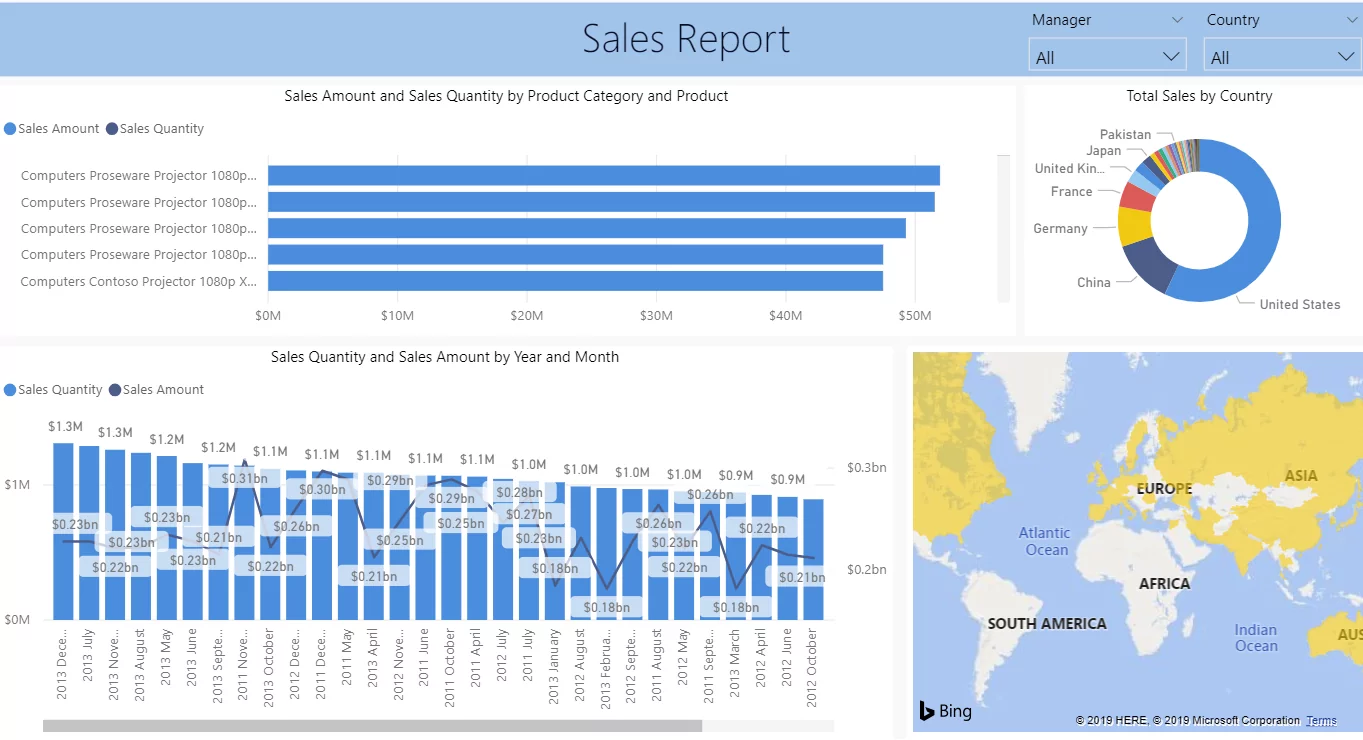
In the image below you will see the Sales Analysis of all the countries. As of now, the report is not filtered by any role.
Creating Roles
We can create a security role by following these steps:
- Go to Modelling tab in Power BI Desktop
- Click on Manage Roles
- Write a DAX expression after choosing the table you want to filter
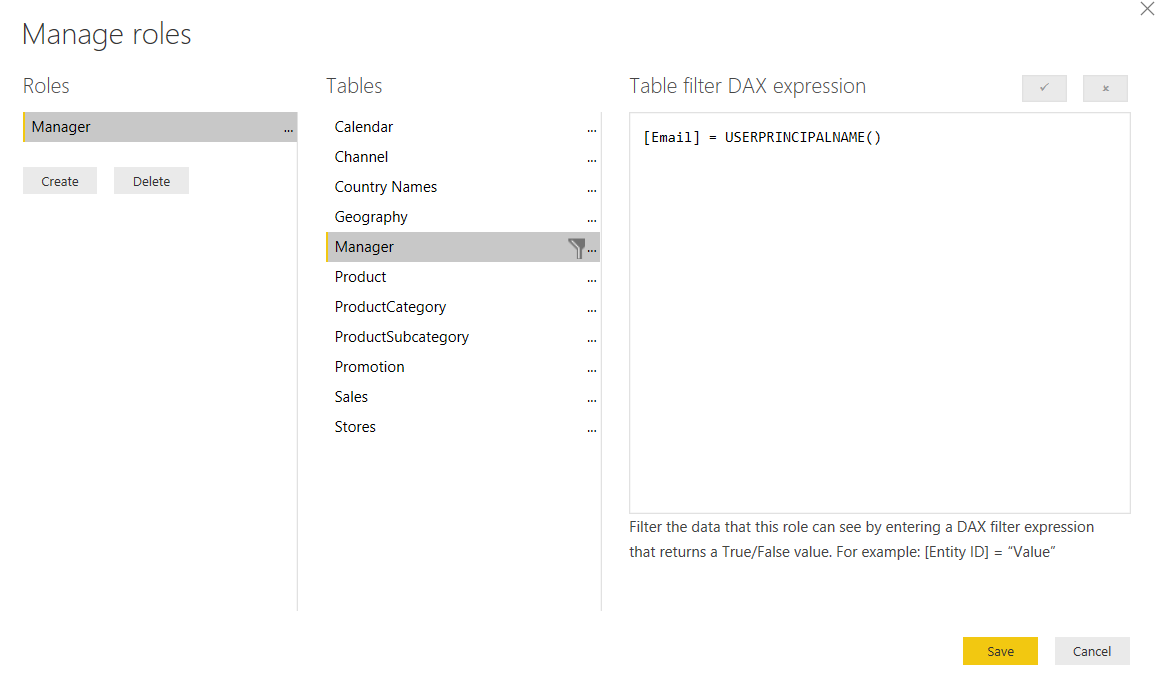
We have used Dynamic RLS, which means it checks user’s sign-in information i.e. USERPRINCIPALNAME() returns the email address of the user through which the user signed in. The DAX expression matches the email field in Manager table with the email address returned by the function call and then automatically filters out data in the report at the row-level.
We can check whether our new role is working the way we want or not by clicking on View as Roles in Modelling tab.
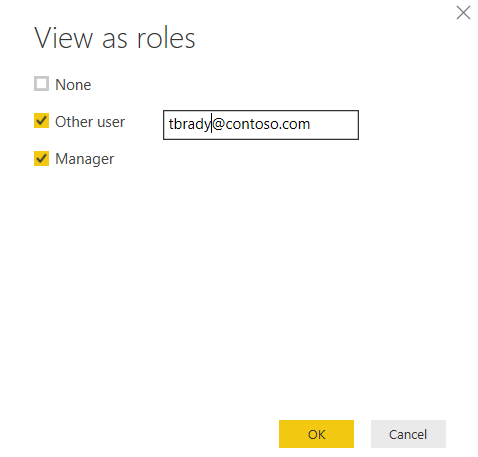
We have now enabled the Manager role. In the next step we will check to see if a manager with email [email protected] can view the data of the other managers or not. When we will click on the OK button, it will start to show the report for the manager whose email address has been entered.
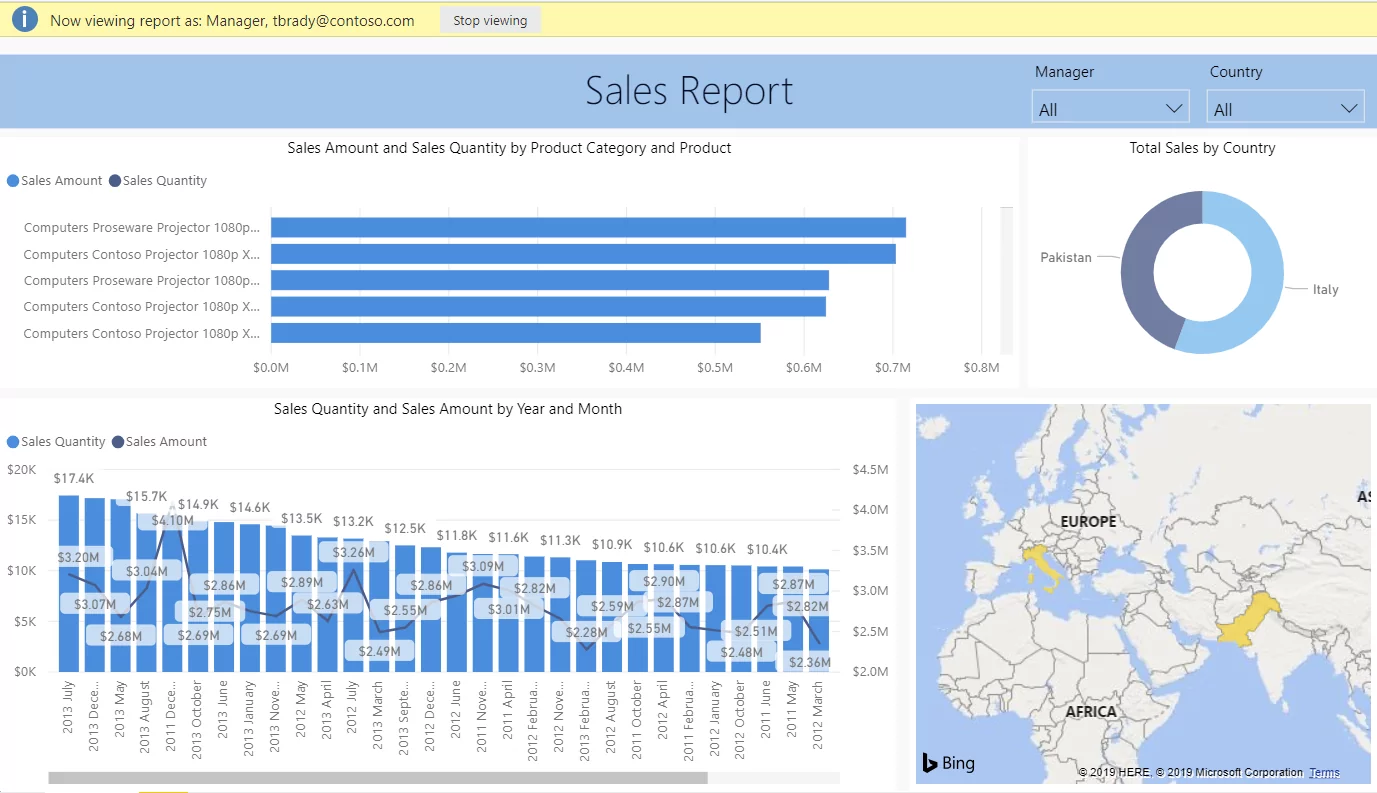
As you can see, the report is now showing filtered data for this specific manager only. This user can only see the sales data of countries he oversees. In the above example, the current manager oversees Pakistan and Italy.
On the other hand, if you don’t want to filter the report based on the user or maybe you want to filter the report based on geographical location, we could do that as well. For example, you want to create a role in which users can only see sales data of a specific country/region e.g. the United States.
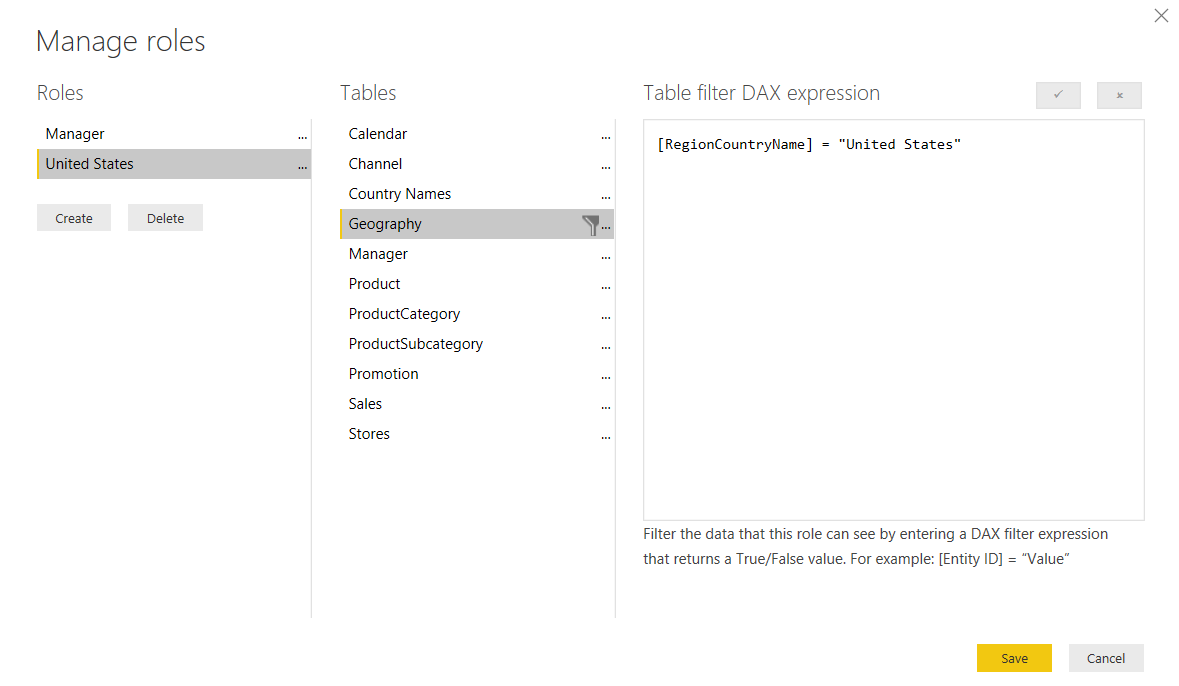
And now, we have created a role that will let the user see the sales data of the United States only. We can now add users to these roles in Power BI service after publishing the report.
Assign Role to Users in Power BI Service
- Publish the report using the Publish icon in the Home
- Upon success, go to Power BI service and navigate to your dataset.
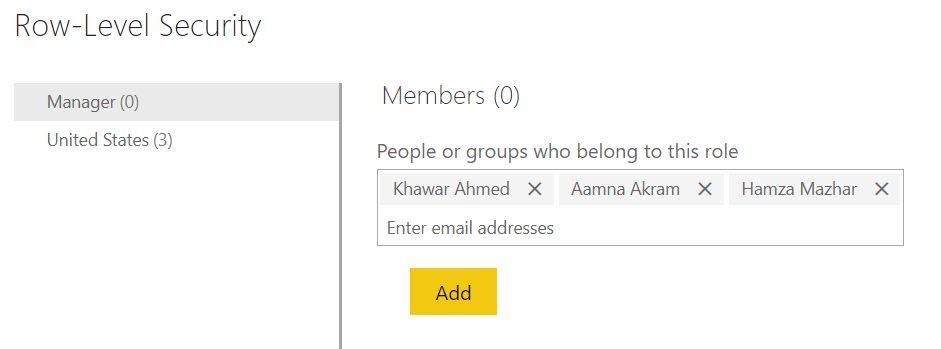
- Go to Security and add the users in their specific roles. Note that you can’t add users from outside of your organization.
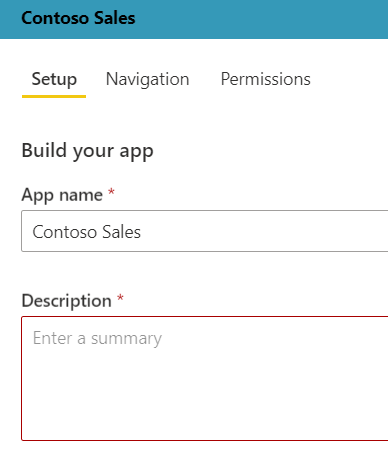
Publish Power BI App
In the Datasets section, click on the Publish App button. By publishing an app, users can easily consume the report content.
The Security Roles will be applied to anyone viewing the report in a Published Power BI App, and changes to the security will not require the app to be published again. These roles will also affect anyone that is a member of the Workspace; provided that the Workspace is set up to allow members to only view content and not edit.
Click on Publish App after you’re done.
Go to the app after you’ve published it. The report will be showing data by user-specific roles.
Conclusion:
Conclusively, through Row Level Security, companies can ensure that their private data is not accessible to unwanted users. In this blog, we showed how users can use RLS to secure their data, we also touched upon the data model to further clarify concepts.
If you have any questions or insights on this blog, do not hesitate to reach out to us!
References

well explained, thank you.