MS CRM 4.0 implementation often involves customization. This customization might be custom web application that open up inside CRM or some content from CRM that opens up in the web applications. If the customizations reside on the same machine as CRM then authentication is not an issue. However at times its is imperative that these custom applications reside on separate servers. This requirement would increase with custom applications pulling data from CRM moving to the cloud. There would be an increased requirement for single sign on or claim based authentication using windows identity foundation. Moreover incase of custom application the security considerations of end users can only be satisfied with a robust security provider in place.
The purpose of this article and ones to follow in this series is to configure STS between the IP and RP. In this post I will configure a web application on windows azure and then will use Microsoft Federation Gateway as the IP by establishing STS between the application and STS service. This would enable the authentication of our azure application to be handled by third party identity provider and would also enable using windows live Id to log into our application. As the token received would be based on the live Id it can be used for claim based authentication. Unfortunately CRM Dynamics does not support claim based authentication so we will be using the SDK class ‘Wlidticket’ for the generation of ticket to be used for accessing CRM service.
The only problem is that for the generation of this ticket we will have to use the LiveId and password. Ideally we should have used the claims for subsequent calls to CRM service and this is what we would do with CRM 2011 in the next article. This is huge because it would mean that external application would have a windows Live login and they will be able to pull up CRM data without having to store user credentials. Many of the applications I have seen today are rejected by consumers because they either require multiple logins or they store user credentials. However that is for the next article. In this blog we will have to live with what is available in CRM Dynamics online.
Before we start with the actual scenario I just want to highlight that we are using the federation gateway so that we could use windows live authentication service and this requires WIF. If you are not hosting application on windows Azure then you can also use RPS (Relying Party Suite). Anyways so lets get to setting up our windows azure application and configuring STS. Usually service account is used for accessing the CRM service so setup the live id for the service account in CRM online. In-order to enable impersonation on CRM online assign the proxy role to the service account.
Learn more about our Microsoft Dynamics 365 Services
Here is the summary of steps we need to do:
1. Register the azure service DNS on Microsoft federation service, msm.live.com.
2. Configure azure application to accept the windows live security token. This is done using WIF.
3. Configure CRM online for the service account and enable proxy account.
4. Configure azure to use ‘Wlidticket’ class from CRM 4.0 SDK and generate ticket to be used for accessing CRM online service.
1. Register the azure service DNS on Microsoft federation service:
a. Use the service account linked with live id to access http://msm.live.com
b. Keep in mind that here you would start with test platform(INT) however in-order to work with CRM online you will have to use production platform.
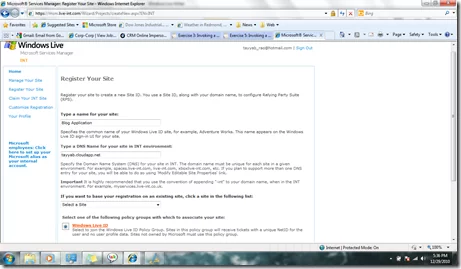
c. Register a new site on msm.live.com.
d. DNS would be the unique identifier for your website. I am using tayyab.cloudapp.net as DNS in this example. DNS name has to be a unique URI. Use the address for your cloud application if it is already available. This can be modified later..
e. On submission you will se the confirmation page. Confirm and go to ‘Modify editable site properties’.
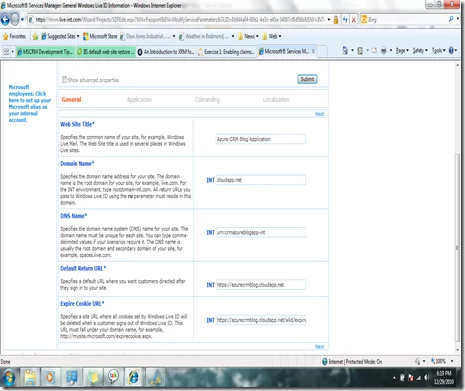
f. Modify the site properties. I have changed the DNS to a URN. Later we will use this in our cloud application to establish STS. Note the return Url is using https.This is because we will be using the MBI_FED_SSL authentication policy.
g. Domain name is ‘Cloudapp.net’ as we plan to deploy our application on Azure Cloud.
h. Set Override Authentication Policy field to MBI_FED_SSL.
i. Click Submit and confirm. You have successfully established STS between MSM live and your cloud application. Now we will setup the cloud application and configure it to receive token from STS service.
2. Configure azure application to accept the windows live security token:
a. Make sure you have WIF, VS 2010 and azure account.
b. Start with your cloud application. This blog is not going to cover the details of creating Azure applications. Once the cloud application is in place we need to first of all configure it to use HTTPS. Generate a certificate and add it to your cloud application on windows.azure.com. (you can use selfssl for this)
c. Configuring your cloud application to use this certificate requires modifying the role properties in cloud application using VS 2010.
d. Go to Web Role properties under the cloud service project and perform following:
i ) Under certifications add the certificate that you just added to the windows.azure.com.
ii) Under Endpoints check https and uncheck http. Choose the certificate we just added.
iii) Under configuration setup trust level to Full Trust. Check HTTPS endpoint.
e. Add WIF classes to enable the cloud applicationto receive and process the claims.
Add following classes:
- CustomIssuerTokenResolver.cs
- WIFSampleRequestValidator.cs
- Wlidticketforazure.cs
Use the link for the labs on WIF.
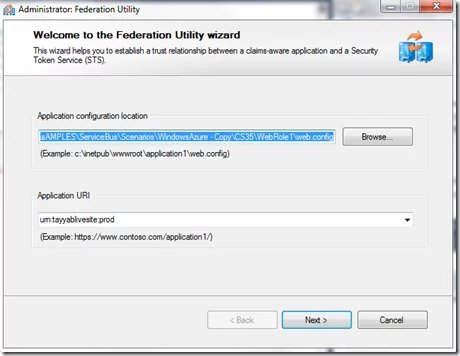
http://channel9.msdn.com/Learn/Courses/IdentityTrainingCourse/WebSitesAndIdentity/WebSitesAndIdentityLab f. Add required assemblies for accessing CRM online webservice and using Identity Model. Keep in mind you will be deploying on cloud platform so you have to make sure Copy Local is “True” for all Dlls that you will need on Azure platform. g. Add web reference for the crm web service. h. Add STS reference to the windows Live STS. Right click on the Web Role and add STS. The federation utility will start.
3. Configure CRM online for the service account and enable proxy account:
a. Make sure you have the account setup on CRM online and it has the proxy role.
4. Deploy application on Azure
a. Deploy the cloud app on Azure.
5. Test Application
a. Access the azure application. If all is configured properly you will be redirected to the windows live login page. Once you have given the login credentials you will receive the claim in your default application.
I have tried to skip the details and the post is long as is so please let me know if you have any questions. Make sure that you look into WIF in some detail so that you have clear understanding as to what is going on with the ticket and claim.
Ideally speaking once we have the claim we should use it for authentication in other applications. However CRM Dynamics online does not support claims so we used the ticket thanks to the Microsoft for providing with this work around. The actual purpose of this blog is to set ground for using claims with CRM 2011 online as it supports claim based authentication. I will be writing about that soon. Happy coding !!!
If you have any question or queries, do not hesitate to reach out to us!


