Introduction
KeyCloak is an open-source identity and access management tool that provides extensive capabilities to cater to modern authentication services. KeyCloak provides an easy way to secure an application with notable features like user federation, iIdentity brokering, and social login.
Many enterprises are leveraging this tool to meet their identity and access management requirements. Today we will share a step-by-step process of how easily we can integrate our Microsoft ADFS environment as a brokered identity provider in KeyCloak.
Configure MS ADFS Prerequisites
Server Hosts:
- Windows Server 2019 with Active Directory and ADFS roles configured. AD Domain Name: crmdemo.local
- KeyCloak application running on a separate host
DNS Setup:
- ADFS hostname will be for this blog. Adfs.ayk****.com
- KeyCloak hostname will be kc.ayk****.com
Setup KeyCloak:
The KeyCloak application needs to be configured with SSL/TLS. This is required to communicate with the ADFS Server. To configure this, we need to perform the following steps.
- Setup KeyCloak application to accept HTTPS connections. This requires getting the SSL certificate from the public Certification Authority. We can also issue certificates from our internal CA server. Steps are provided in Server Installation Guide.
- Export ADFS SSL certificate in KeyCloak Jjava Cert Store.
- In the AD FS management console, go to Service → Certificates node in the tree and export the Service communications certificate.
- Import the certificate into a Java truststore (JKS format) using Java key tool utility.
- Setup the trust store in KeyCloak as described in the Server Installation guide.
Read More about the KeyCloak Tool: Configure Azure AD As A Brokered Identity Provider In KeyCloak.
Explore Seamless Integration with AlphaBOLD's Azure Services
Elevate your authentication process by implementing Azure services. Explore our expertise in MS ADFS configuration with Keycloak. Consult with AlphaBOLD for a seamless integration journey.
Request a ConsultationSetup Identity Provider in KeyCloak
In this section, we will setup ADFS as a brokered identity provider in KeyCloak. To complete this process, please follow the below steps.
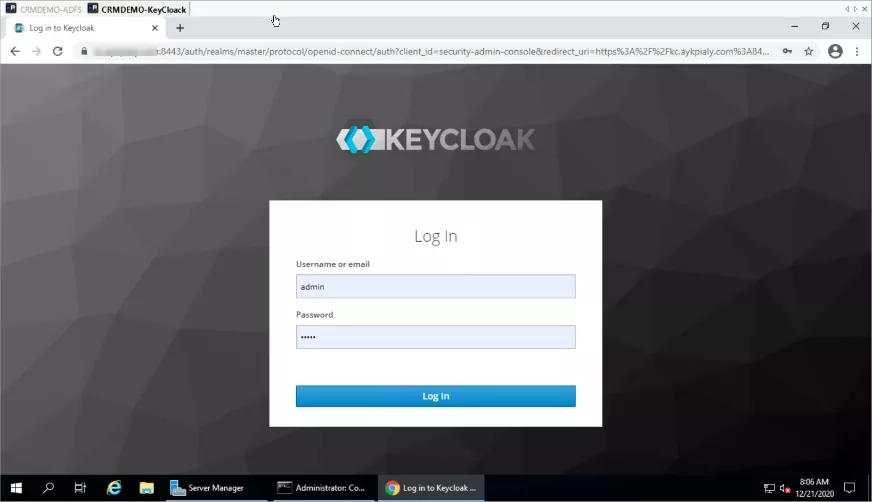
- Login to KeyCloak Administration Console and navigate to the identity Providers page.
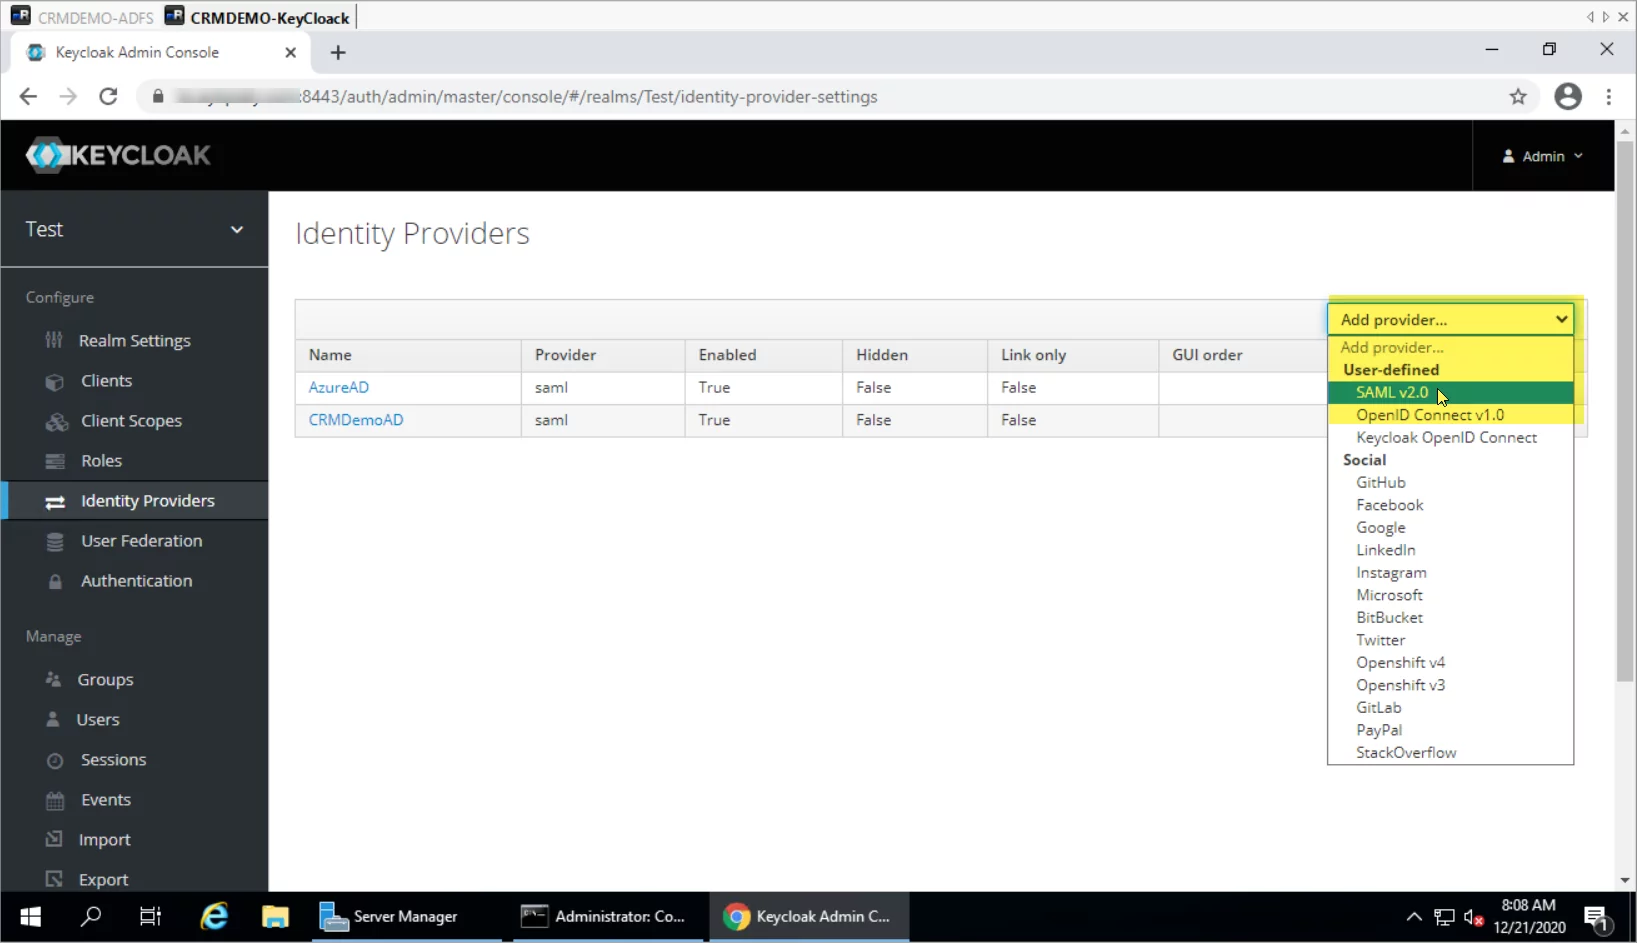
- Click on Add Provider and Select SAML v2.0.
- Now scroll to the bottom of the page and enter ADFS Federation Metadata URL and Click import.
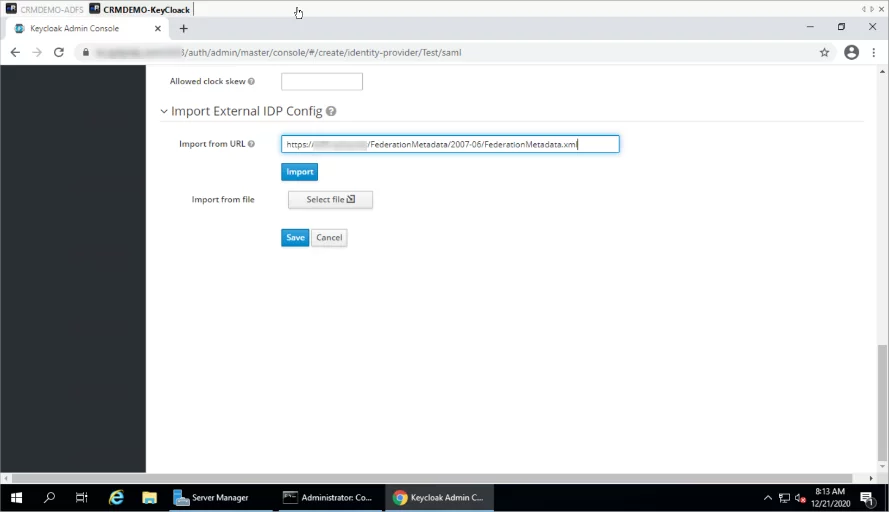
- Once imported, check, and update the configurations as per the following screenshot.
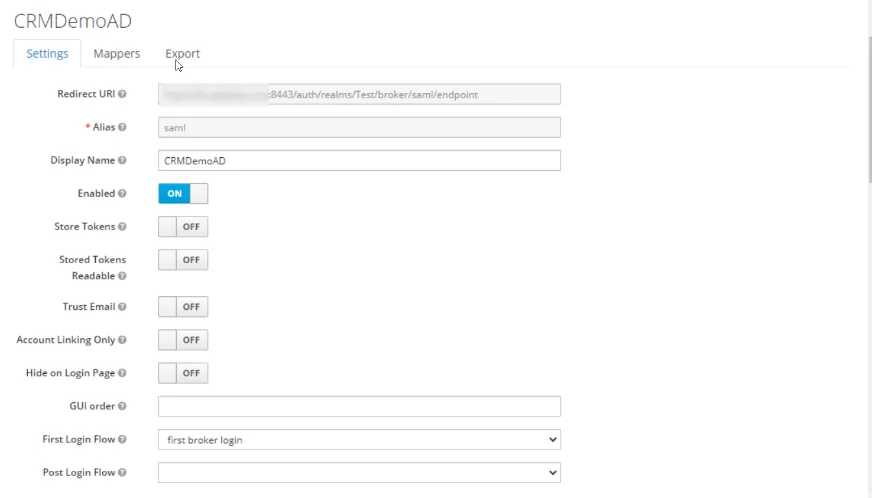
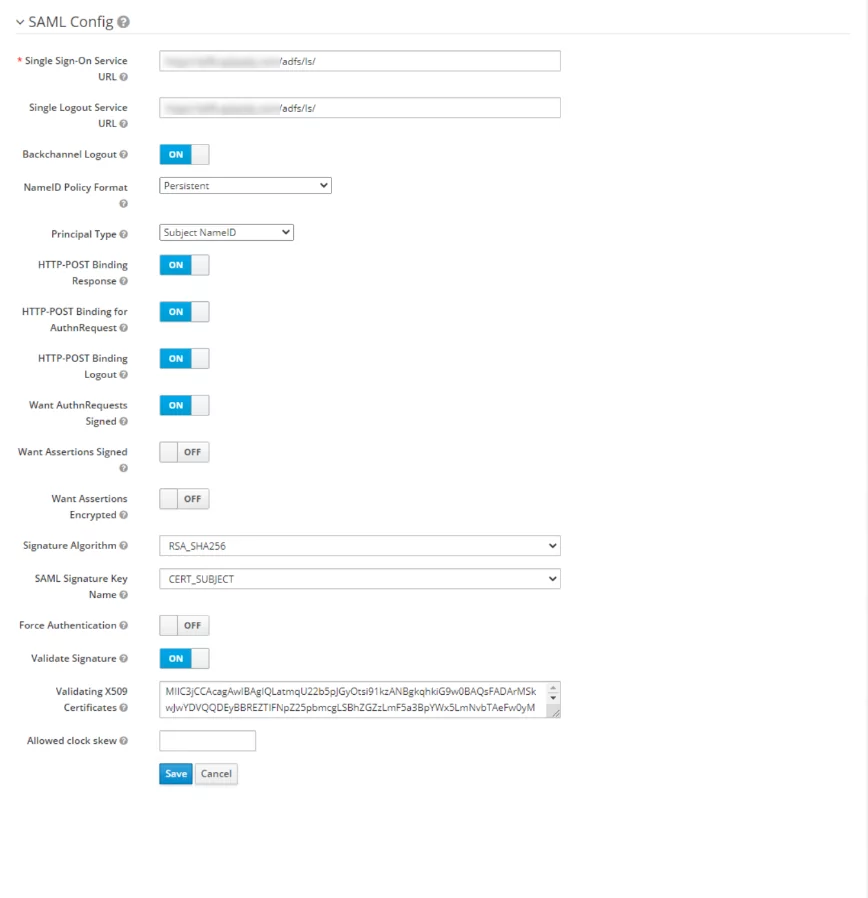
- Setup Mappers, In the steps below, AD FS will be set up to send emails and group information in SAML assertion. To transform these details from SAML document issued by AD FS to KeyCloak user store, we will need to set up two corresponding mappers in the Mappers tab of identity Provider.
- Mapper named Group: managers will be of type SAML Attribute to Role, and will map attribute named http://schemas.xmlsoap.org/claims/Group, if that has attribute value managers, to role manager.
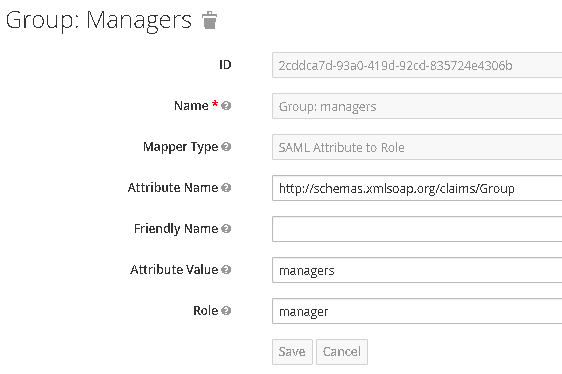
- Mapper named Attribute: email will be of type Attribute Importer, and will map attribute named http://schemas.xmlsoap.org/ws/2005/05/identity/claims/emailaddress into user attribute named email.
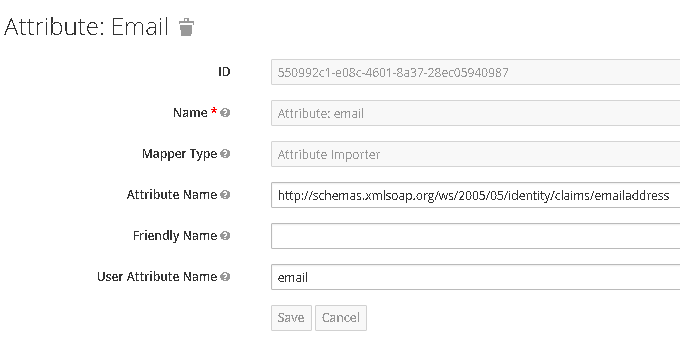
Once the mappers are setup, we are done on the KeyCloak side. Now we need to get the Federation Metadata URL of KeyCloak for ADFS relaying Party Trust. We can get that URL from the Uri Descriptor field and adding “/descriptor” at the end.
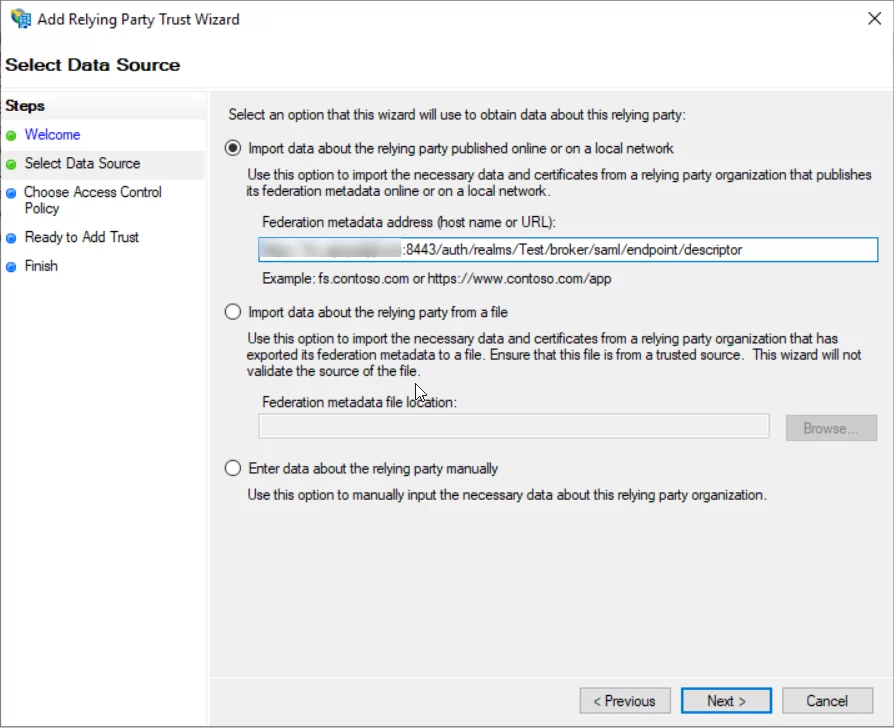
“https://kc.ayk***.com:8443/auth/realms/Test/broker/saml/endpoint/descriptor”
Setup Relaying Party Trust In ADFS
In this section, we are going to add relaying party trust in our ADFS Server.
- Login to the ADFS server and open the ADFS management console, and right-click on Relaying Party Trust.
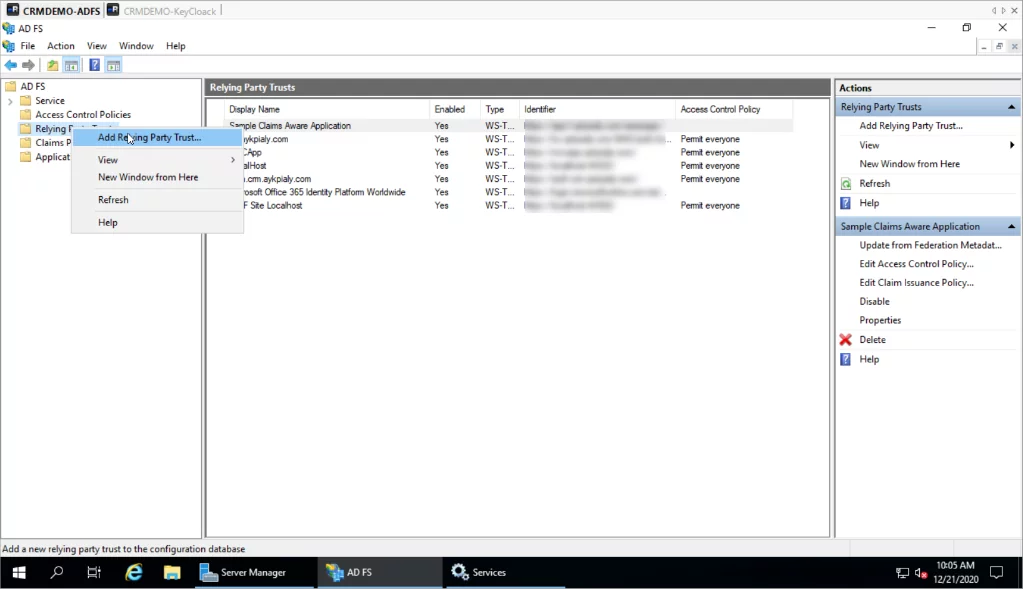
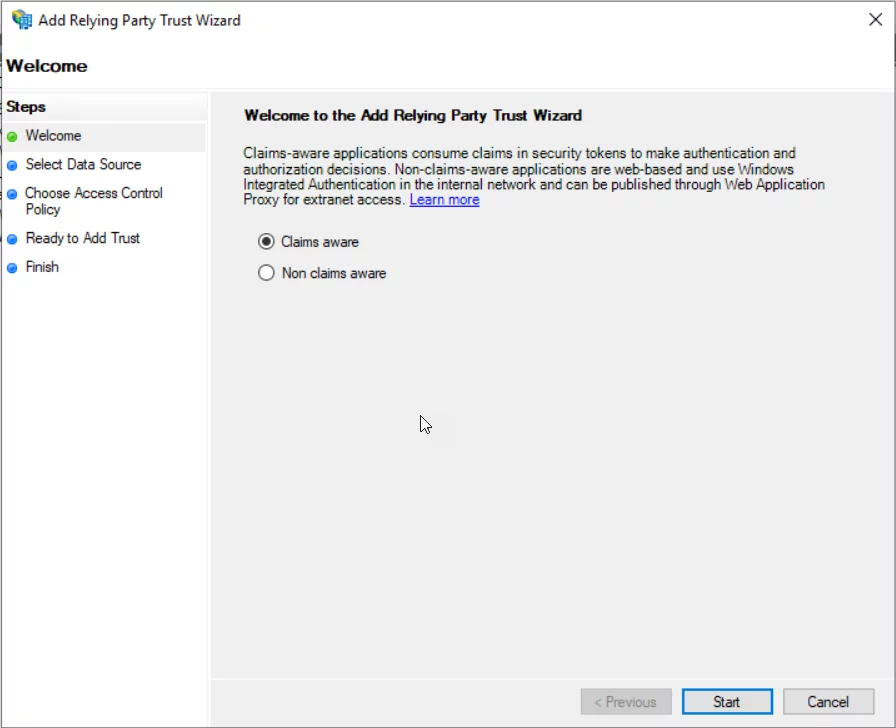
- Select Claims Aware and Click Start.
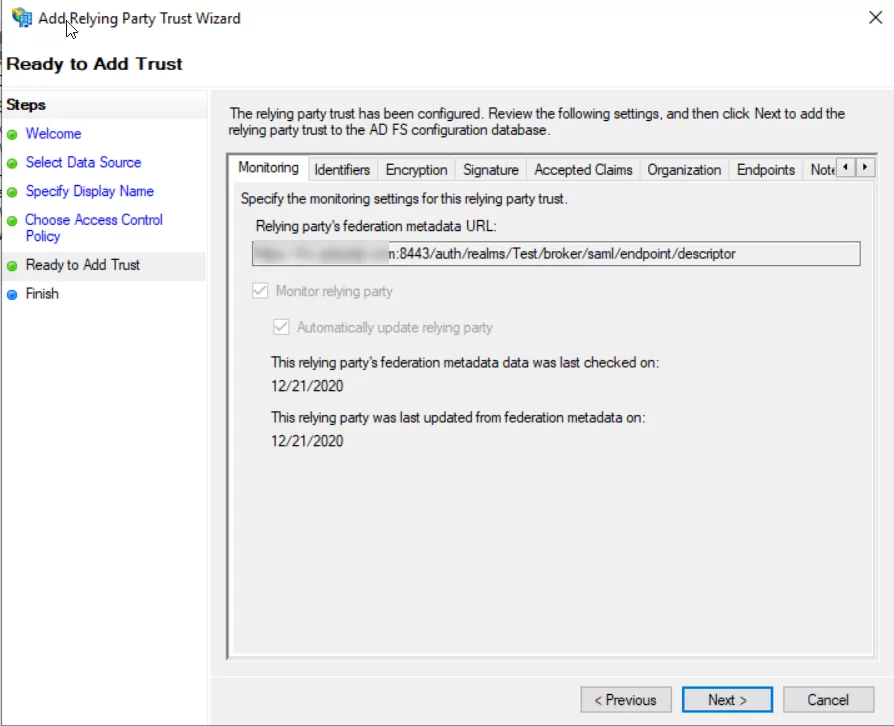
- Enter the KeyCloak SAML Descriptor URL, which we obtained at the end of the 1st phase.
- Enter the Display Name and click Nnext.
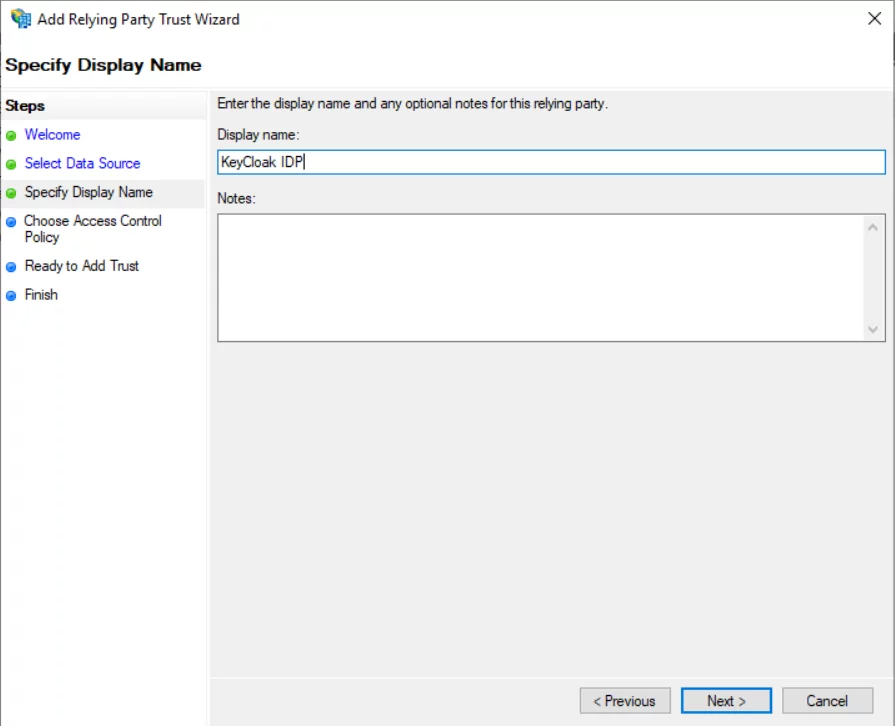
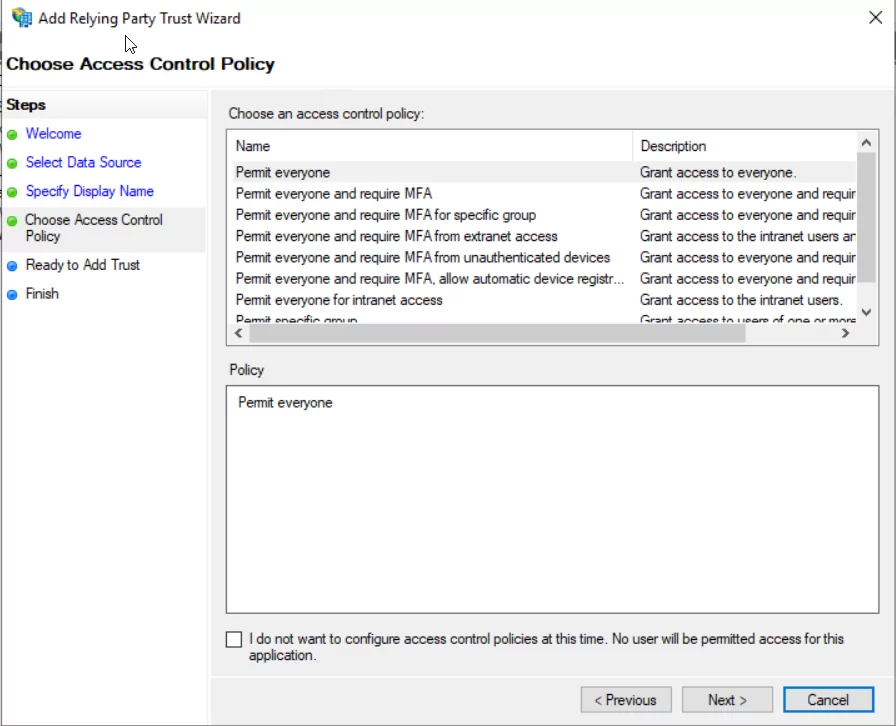
- Choose the required Access Control Policy and click next, we will go with the Permit everyone.
- Validate all the information on the ready page and click next to add the KeyCloak relaying party trust.
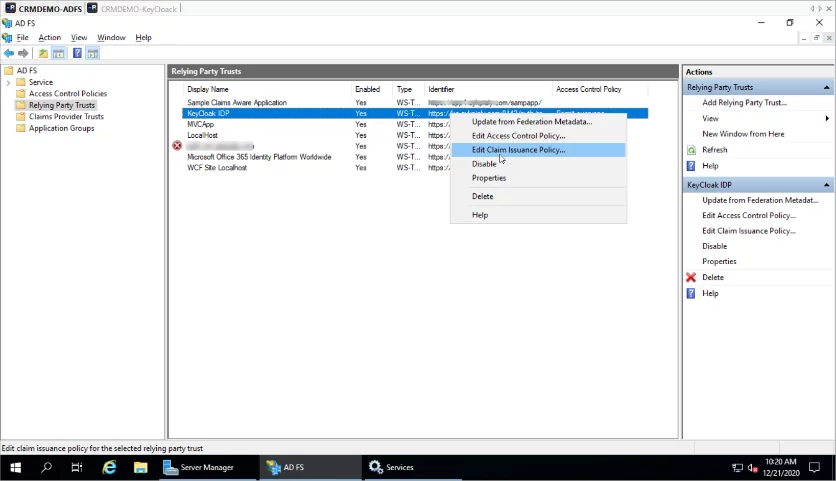
- Setup Claim Mapping: Once the Wizard is completed, right- click on KeyCloak IDP, and select edit Claim Issuance Policy.
- Click and select Transform, and incoming claim and click next.
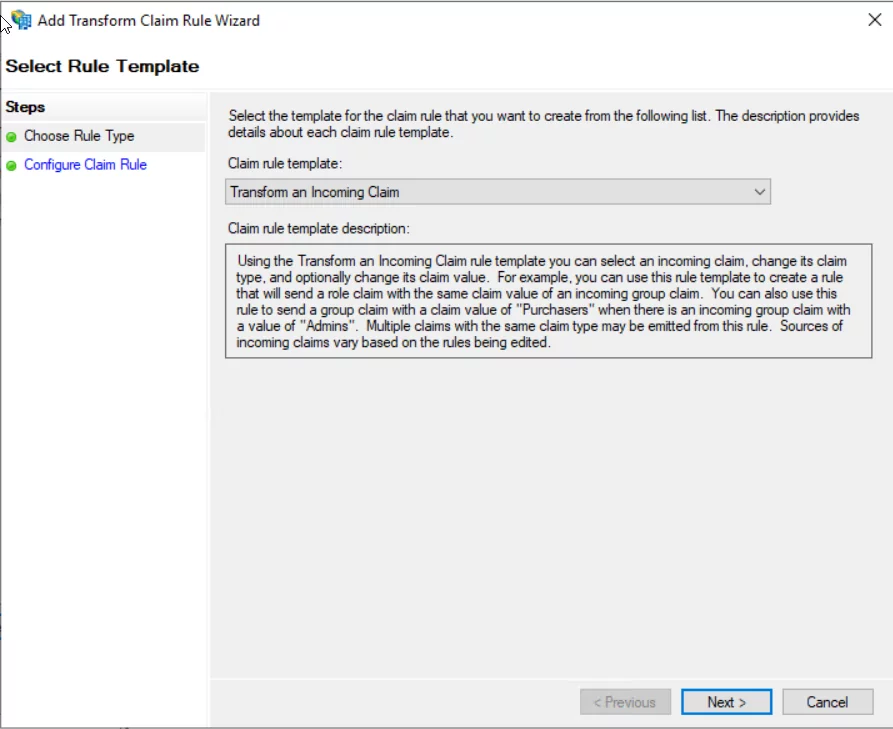
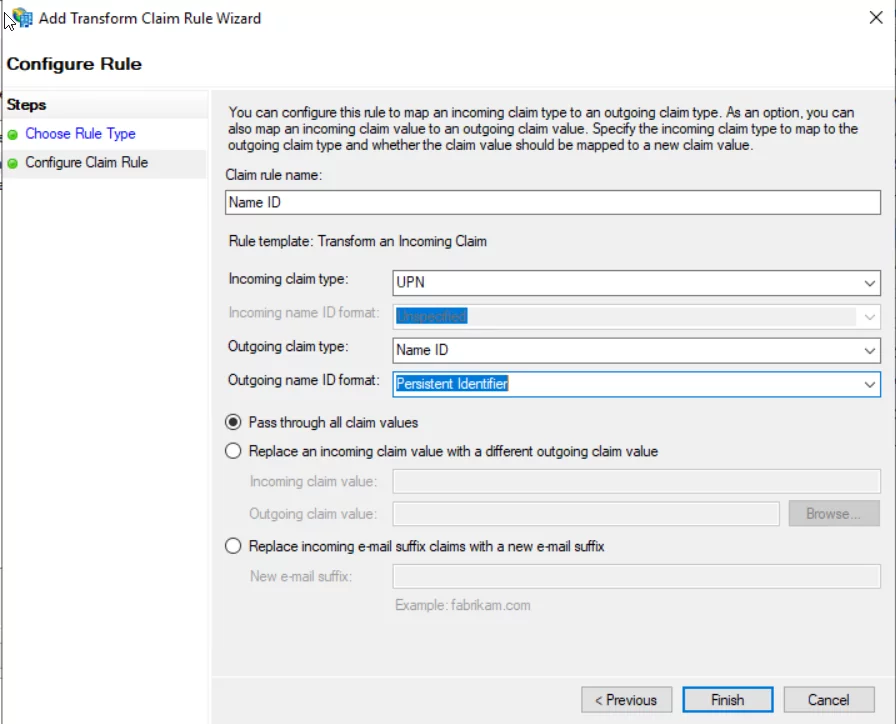
- Enter Name and incoming and outgoing claim as per the following.
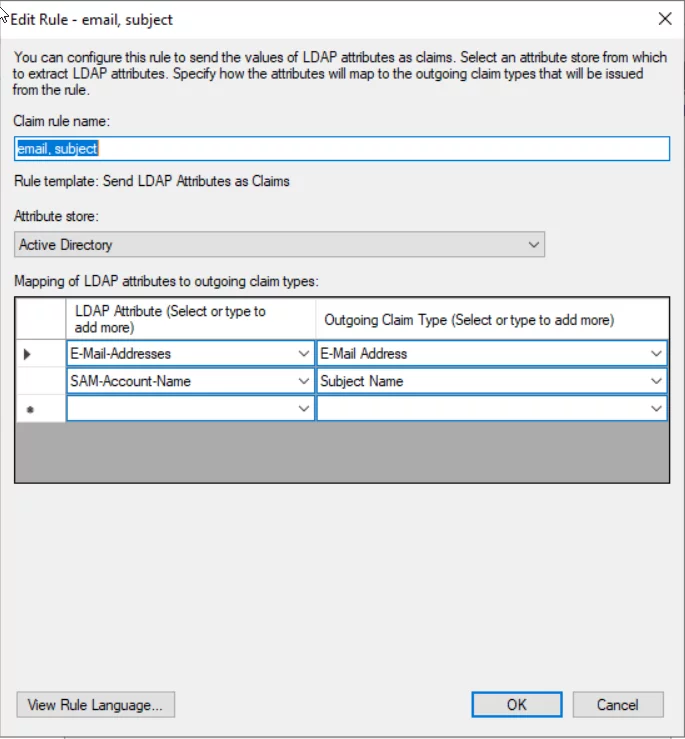
- The second rule will map user e-mail to the SAML response. In the Add Transform Claim Rule window, select Send LDAP attributes as Claims rule type. You can add other attributes as needed:
Transform Keycloak with AlphaBOLD's AI Insights!
Ready to infuse intelligence into MS ADFS Configuration in Keycloak? AlphaBOLD's AI Services bring a new dimension to authentication.
Request a ConsultationValidation: Configure MS ADFS
- Open any browser window and navigate to the KeyCloak Application login page. We should see the CRM Demo AD button. This is the Alias of the identity provider we added in the KeyCloak in the 1st step.
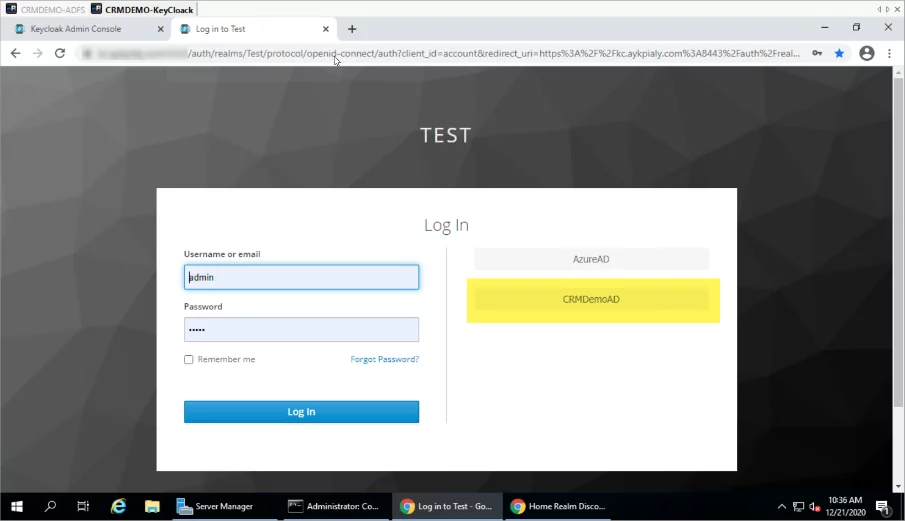
- Click on the CRMDemoAD button, and it should redirect to the ADFS login screen.
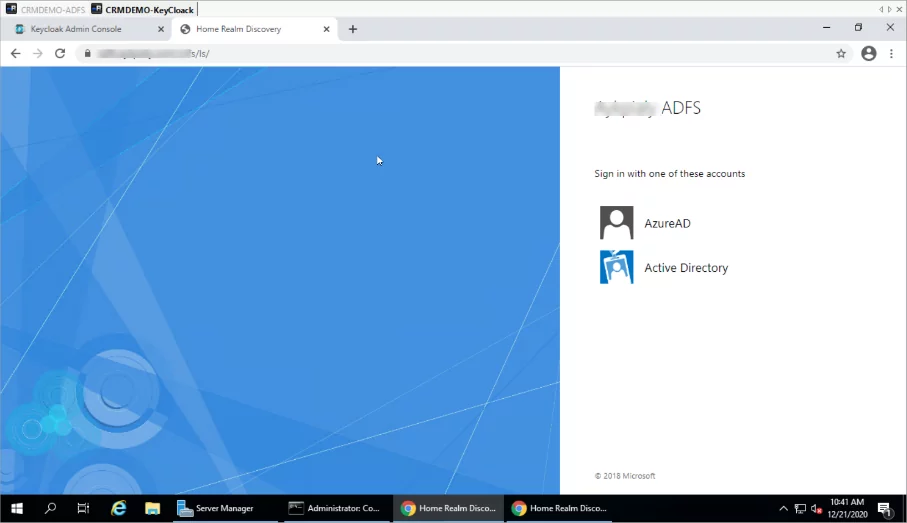
- Select the appropriate identity Provider if you have multiple identity providers configured in the ADFS, and after entering the credentials the browser should be redirected back to the KeyCloak application.
Explore more about Why CIOs Prefer Azure DevOps for Custom Development Projects.
Conclusion
Most enterprises have large Microsoft Windows footprints and, therefore, use Active Directory and ADFS for user directory management, identity federation, and single sign-on needs. At times these organizations, need some additional identity and access management tools to incorporate the different business applications requirements to extend the IAM domains. KeyCloak is most common open source IAM solution to cater those needs and integrating ADFS with KeyCloak can significantly enhance the solution acceptability and simplify the IAM solution.
If you would like to extend your Single Sign on solution, please see our other blog on Configuring ADFS with Azure AD and Dynamics 365 on-prem systems, please go to this link.
Explore Recent Blog Posts


