Schedule and Reschedule
Items Scheduled in Dynamics 365 Field Service often require adjustments due to changes in your business. There can be several scenarios that can result in a delay or push in the schedule. Some of these examples are listed below:
- An emergency work order is created and needs someone to schedule it immediately.
- A customer cancels or needs to reschedule.
- A resource calls in sick, and you need to find a replacement.
- An accident occurs on a specific highway.
Luckily, The Schedule Board makes it easy for dispatchers to schedule items in these different scenarios. Four methods are most used to schedule items using the Schedule Board:
- Using the Requirements Panel
- Using the Map View
- Creating time blocks on the calendar
- Leveraging the Create Resource booking panel
Note: You can schedule resources directly from the work order record as well. On a work order record, when you click the “Book” button, the Schedule Assistant will open. The Schedule Assistant is similar to the Schedule Board; however, it has prepopulated information, which is related to the work order specifically.
Using the Requirements Panel
The Requirements Panel displays a list of all the currently active resource requirements that need to be scheduled. Each requirement will include items like the duration required, priority, and time windows promised. You can schedule items using two options using the Requirement Panel:
- Drag and Drop: Simply drag the item from the requirements panel to the schedule board.
- Find Availability: Leverages Schedule Assistant to find resources and schedule an item.
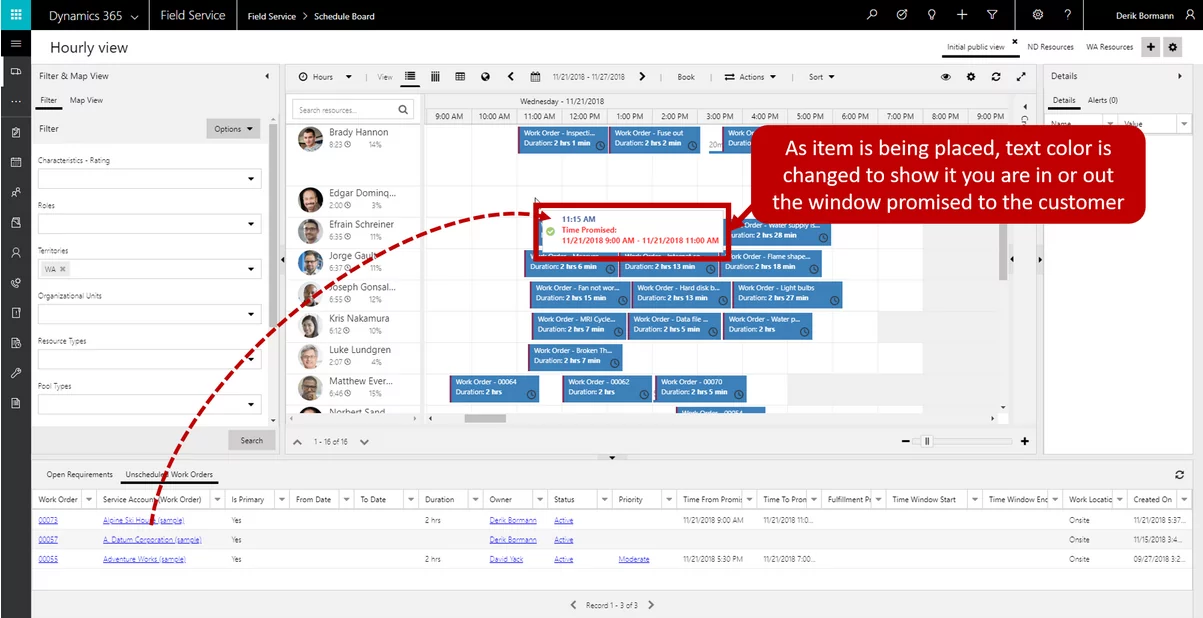
Drag and Drop
The dispatcher will simply select the item that they want to schedule and drag it up on the board. By default, the dispatcher will not be stopped from scheduling if he schedules within different time slots than promised in the requirement. Only the text color inside the scheduled tile will become red. If you have scheduled as per the promised time slot, then the text color will be green. Organizations that want to prevent an item from being scheduled if specific requirements are not met can implement booking rules for this.
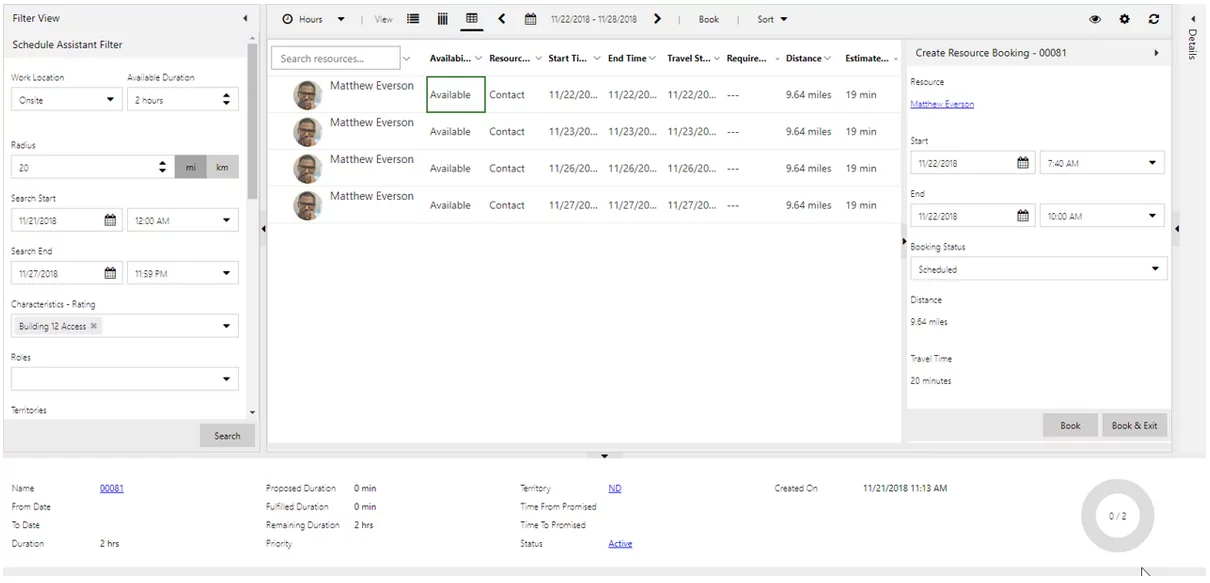
Find Availability
While drag and dropping is a quick way to schedule, it does not consider the skills, territories, or other predefined items outlined in the requirement. To assist in considering any specific items needed, the dispatchers can use the Find Availability feature. When a dispatcher selects a requirement in the panel, they can click on the Find Availability button on the record, and it will open the Schedule Assistant.
Any available resources that meet the criteria specified in the resource requirement will be displayed. The criteria that were used to filter the request will be displayed in the filter view. If you need to expand the results returned, the criteria can be modified as needed for that specific request.
Once you are ready to book the item, click the book or book & exit button to create the booking.
Scheduling using the Map view filter
Using the Map view, a dispatcher can visually see where the items in need of scheduling are, compared to the location of the resource.
Scheduling using the map view is very similar to the Requirement Panel. However, there is one key difference; the dispatchers can visualize who the item should be assigned to by using the map.
The items can be scheduled using:
Drag and Drop: Simply drag the item from the map panel to the schedule board.
Find Availability: Leverages Schedule Assistant to find resources and schedule an item.
Let’s have a look at the following image of the map view with an example:
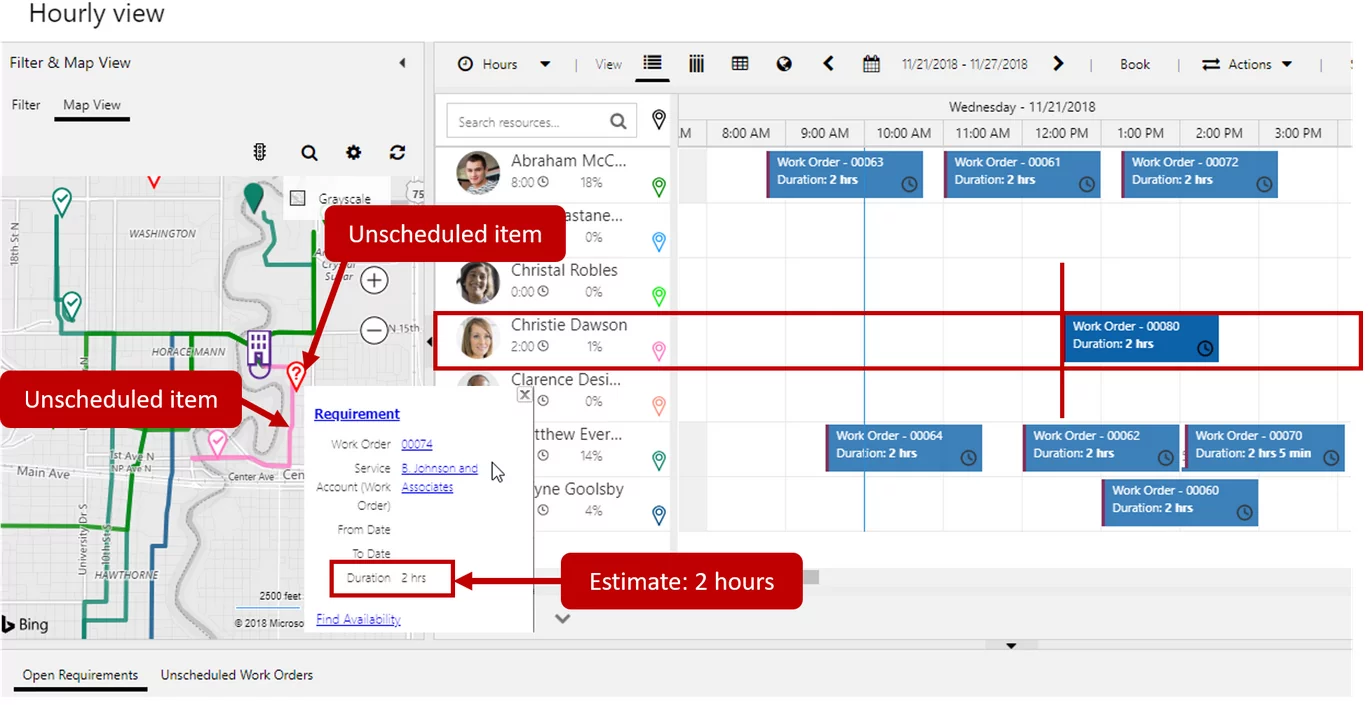
We can see from the following from the image:
- Christie has a work order scheduled for today at 12:30.
- The map shows the most likely route for Christie to take.
- There is an unscheduled work order that falls on Christie’s route.
- The item is estimated to last two hours.
Christie has 2 hours free today before her 12:30 appointment.
In this instance, we can easily drag the requirement pin on the map and place it in an available time slot for Christie. Once it has been scheduled, the route on the map will change to show the newly scheduled item.
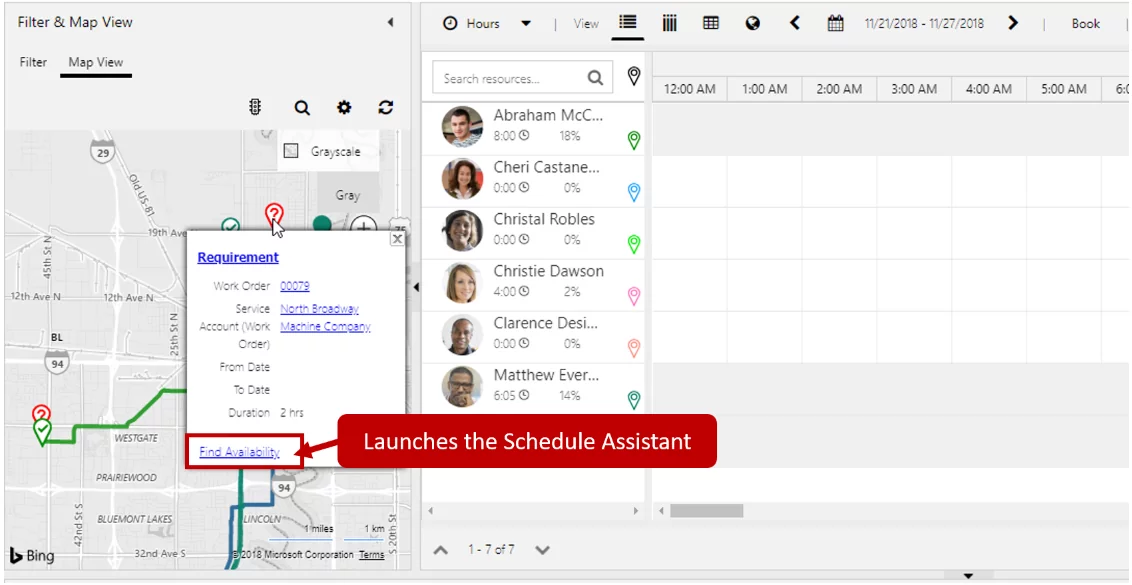
Find Availability
Another option is to use the Find Availability feature. The difference with this feature is that it can be accessed by hovering over the pin on the schedule directly. Once you click the Find Availability button, you will be taken to the same Schedule Assistant screen that we mentioned previously.
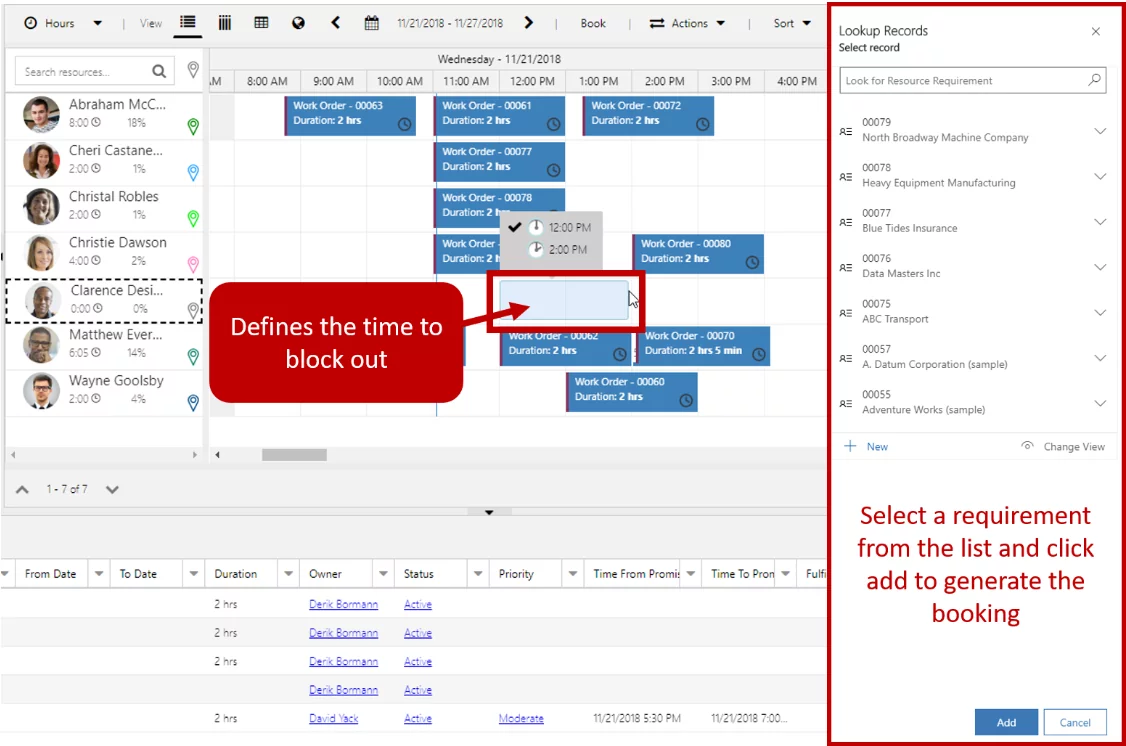
Blocking time for a resource
When you see that a resource has an available time slot open that you want to fill, you can drag to select the amount of time you want to fill for the resource on the calendar. For example, you could drag a 2 hour from 1:00 PM to 3:00 for Wayne. You will be provided with a list of work orders that could be scheduled for that time. After you select the item you want, a booking will be created and placed on the calendar.
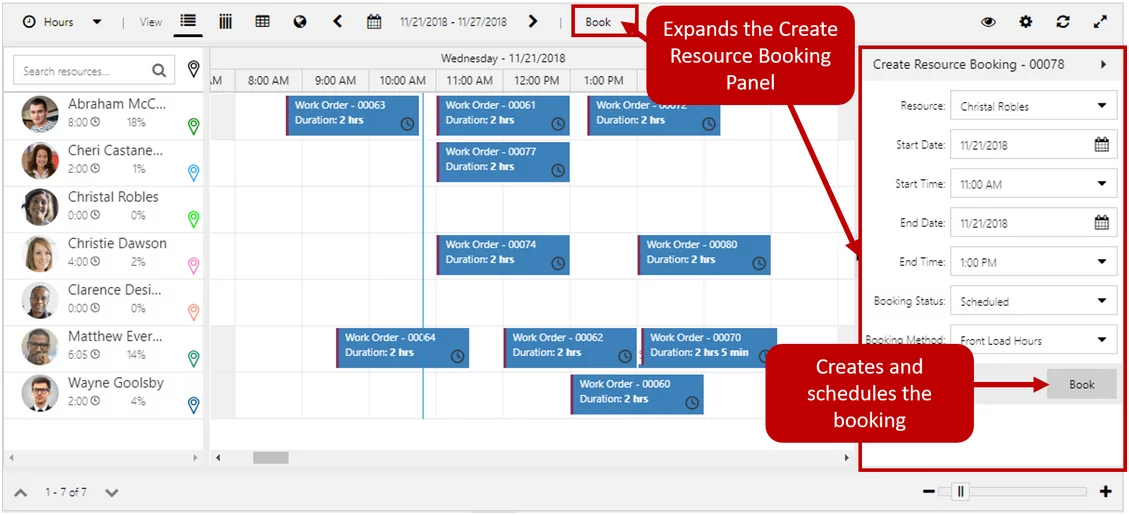
Using the Create Resource Booking Panel
The Create Resource Booking panel can be accessed by either expanding the panel or by clicking the book button on the Schedule Board toolbar.
Once you have displayed the panel, you need to select a requirement record and a resource which you want to book, and the panel will be populated with the following information:
- Resource: Specifies the resource this booking will be assigned to.
- Start Date: Start date of the booking. (Defaults to today)
- Start Time: Start time of the booking. (Defaults to 8:00 AM)
- End Date: End date of the booking. (Defaults to today)
- End Time: End time of the booking. (Defaults to 8:00 AM)
- Booking Status: Status to assign to the booking.
- Booking Method: Defines how hours are allocated.
You can modify options in the panel and click the “Book” button when you are ready to go.
Scheduling Directly from a Work Order
To schedule directly from the work order, you can use the “Book” button to schedule the work order.
When the Schedule Assist loads, it will show potential resources that could be scheduled. A single resource could be returned multiple times, depending on their availability during the period specified in the filter. As was mentioned previously with the Schedule Assistant, the filter criteria used can be modified to expand or reduce the number of results returned.
Here is a screenshot of Schedule Assistant:
Often, we find that items are missing from the list in the Schedule Assistant. There are several reasons why items might not be displayed in the Schedule Assistant. However, the most common things to check for first are:
- No Resources meet the characteristics defined: Look at the filter criteria that is being used. Make sure that you have resources that meet those requirements. You can remove the criteria to see if the results are returned. If you are still not seeing results, it could be an address issue.
- Starting and ending locations associated with the resources: If the address associated with a resource cannot be located, the resource will not be returned. A resource’s starting and ending locations are defined on the resource record and can be set to either resource address, organizational unit address, or location agnostic.
- Resource Address: If the resource address is used, ensure that you have valid address information (latitude and longitude) for the address being used based on the resource type.
- Resource Type = Account: Address of account record related to the resource.
- Resource Type = Contact: Address of the contact record related to the resource.
- Resource Type = User: Address associated with the user’s Office 365 account.
- Organization Unit Address: If the organizational unit is being used, ensure that it has valid latitude and longitude values.
- Resource Address: If the resource address is used, ensure that you have valid address information (latitude and longitude) for the address being used based on the resource type.
Exercise – Reschedule and move items
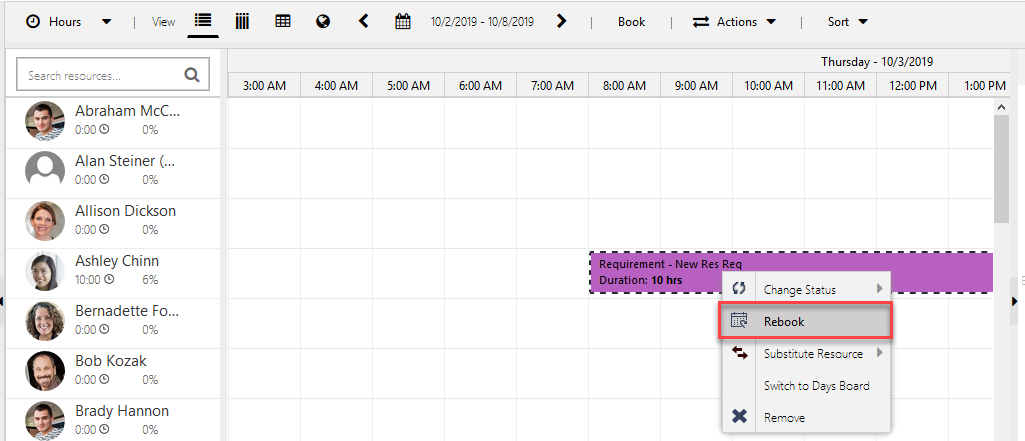
The Schedule Board offers three ways that the dispatchers can reschedule items or substitute different resources.
- Rebook
- Substitute resource
- Move items to a different day
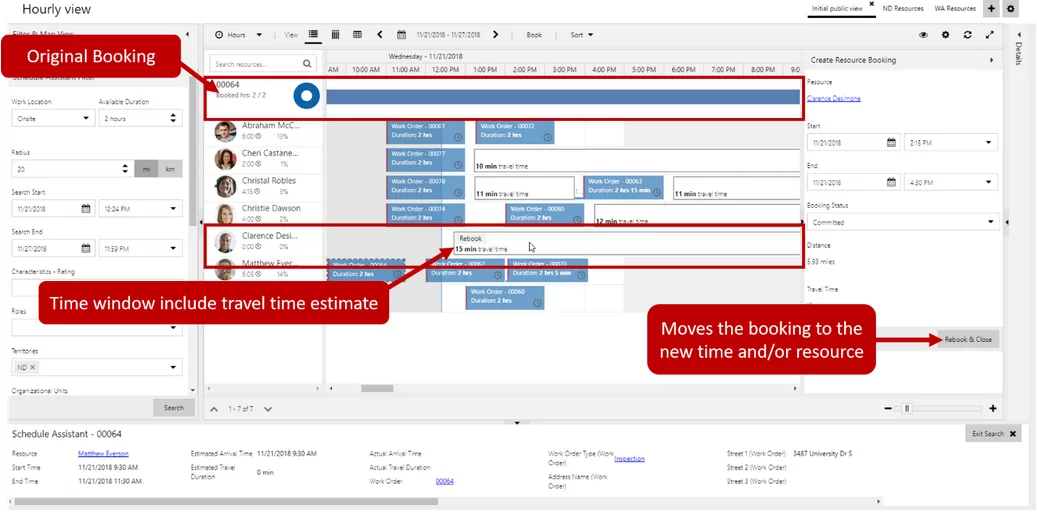
Rebooking Items
Rebooking provides the ability to move a booking to a different time or day, as well as to assign it to a different resource. An item can be rebooked by right-clicking on the booking you want to work with and choosing the rebook option.
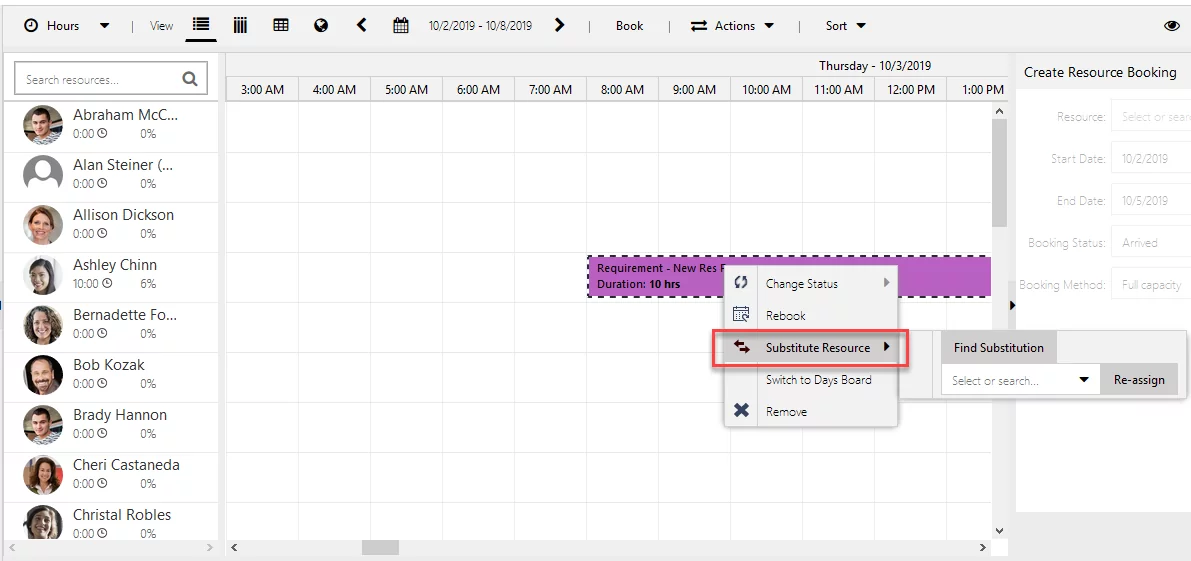
Substituting Resources
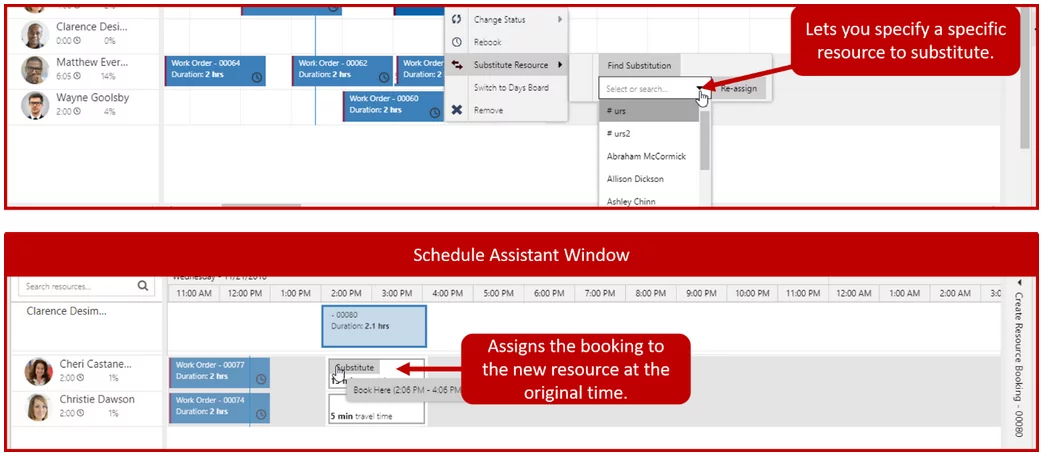
Substituting resources is different from rebooking because you are not moving the booking to a different time. You are simply replacing the original resource associated with the booking with a different resource.
When you substitute a resource, you will have two resource substitution options available:
- Substitute a specific resource: If you know the specific resource that you want to substitute, you can select that resource and click substitute.
- Find a resource to substitute: If you are not sure which resource to use, you can select find a substitute, and the Schedule Assistant will open to provide suggestions of resources that are available at that time.
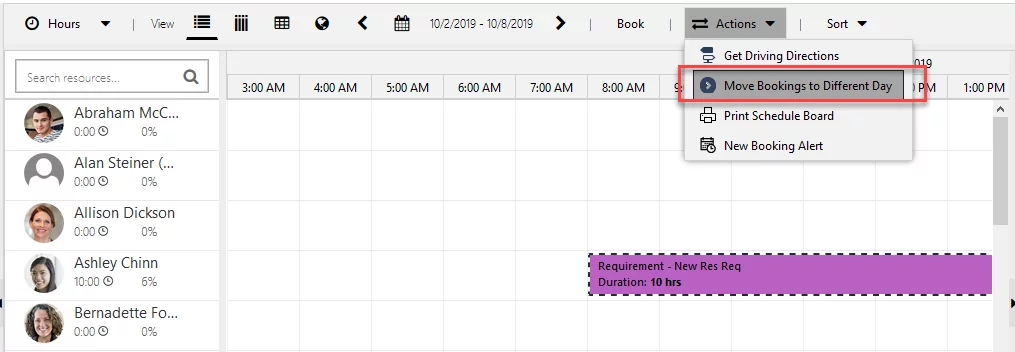
Moving bookings to a different day
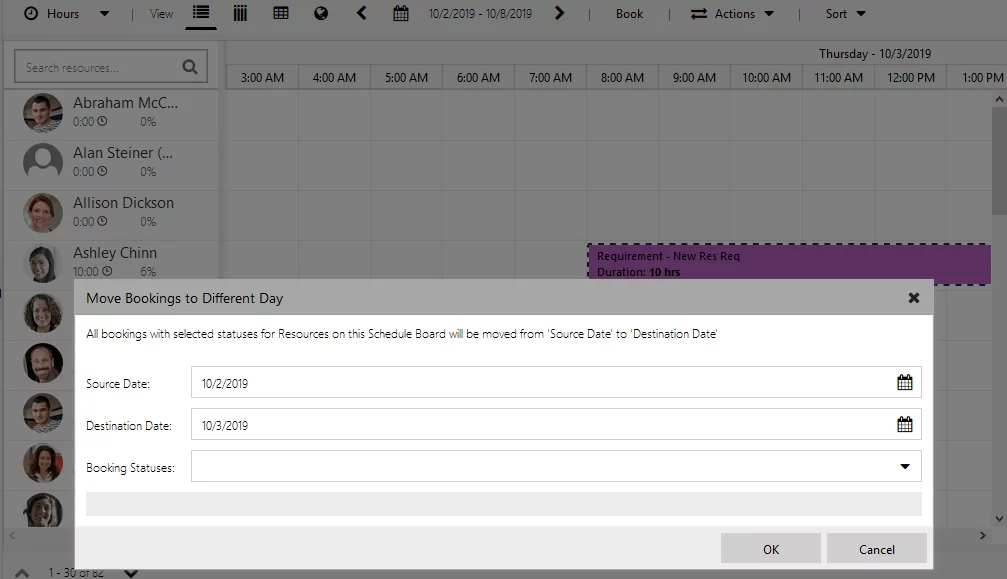
If you want to change the date of a previously scheduled booking, then just select the existing booking from the Schedule Board and from the top menu “Actions”, choose “Move Booking to Different Day”. Then, you need to specify the following information:
- Source Date: Defines the date that the bookings are currently scheduled for.
- Destination Date: Defines the date that you want to move the bookings to.
- Booking Statuses: Specifies the booking status that will be used to determine which bookings to move. For example, you only want items that are scheduled to be moved. Items that are in progress, completed, or traveling should stay on the date they are at.
Conclusion
That is it for this blog. I hope this blog was helpful and that you understood the guidelines we discussed easily. We will continue giving more insights into MB-240 Certification Microsoft Dynamics 365 Field Service in the third part of this blog. Stay tuned!
If you have any question or queries, do not hesitate to reach out to us!
Also, feel free to reach out to us with your questions! We will be happy to answer them.