Introduction
Customer support representatives must handle numerous amounts of emails as part of their daily routine. This poses a lot of challenges for them as handling incoming and outgoing emails efficiently can become taxing. The chances of human error also tend to increase when a representative must handle a vast amount of data in a short period. To facilitate this entire process customer support representatives often make use of Dynamics 365’s queues to control the routing of emails, minimize human error and ensure that the emails are handled promptly.
What Are Queues?
Queues are essentially a layer on top of shared mailboxes in Exchange. They pull incoming emails into Dynamics 365 and then route the mails to different teams. Queues can be a very useful tool for customer service representatives as it allows users to view all incoming emails in one place. Furthermore, it can be customized by administrators to assign items like emails or case records to different people and teams.
Problem Scenario
A common use case for handling email correspondence is to receive emails in Dynamics 365 via these queues for incoming emails, and then actioning them as cases. This workflow can be supported out of the box, but the outgoing correspondence is not quite as straightforward as the incoming emails. Emails sent from a case in Dynamics can be received by the customer with the personal email address of the representative who is actioning the case by default. This poses problems for most organizations:
Elevating Your Dynamics 365 Experience
Elevate your Dynamics 365 experience with AlphaBOLD’s expert services. Whether it's customization, integration, or training, our team is here to ensure you get the most out of Dynamics 365.
Request a DemoSolution
To resolve this, we need to change the default behavior to ensure that emails originating in Dynamics are sent to customers in a queue rather than directly from a given user. In this blog, we will be looking at two methods that will help solve this problem for users!
Before we move on, here are some prerequisites that you need to be aware of!
- A queue for the customer service team has already been created, and the mailbox includes a valid email address that has already been enabled for your organization. In our example, we will be using this queue:
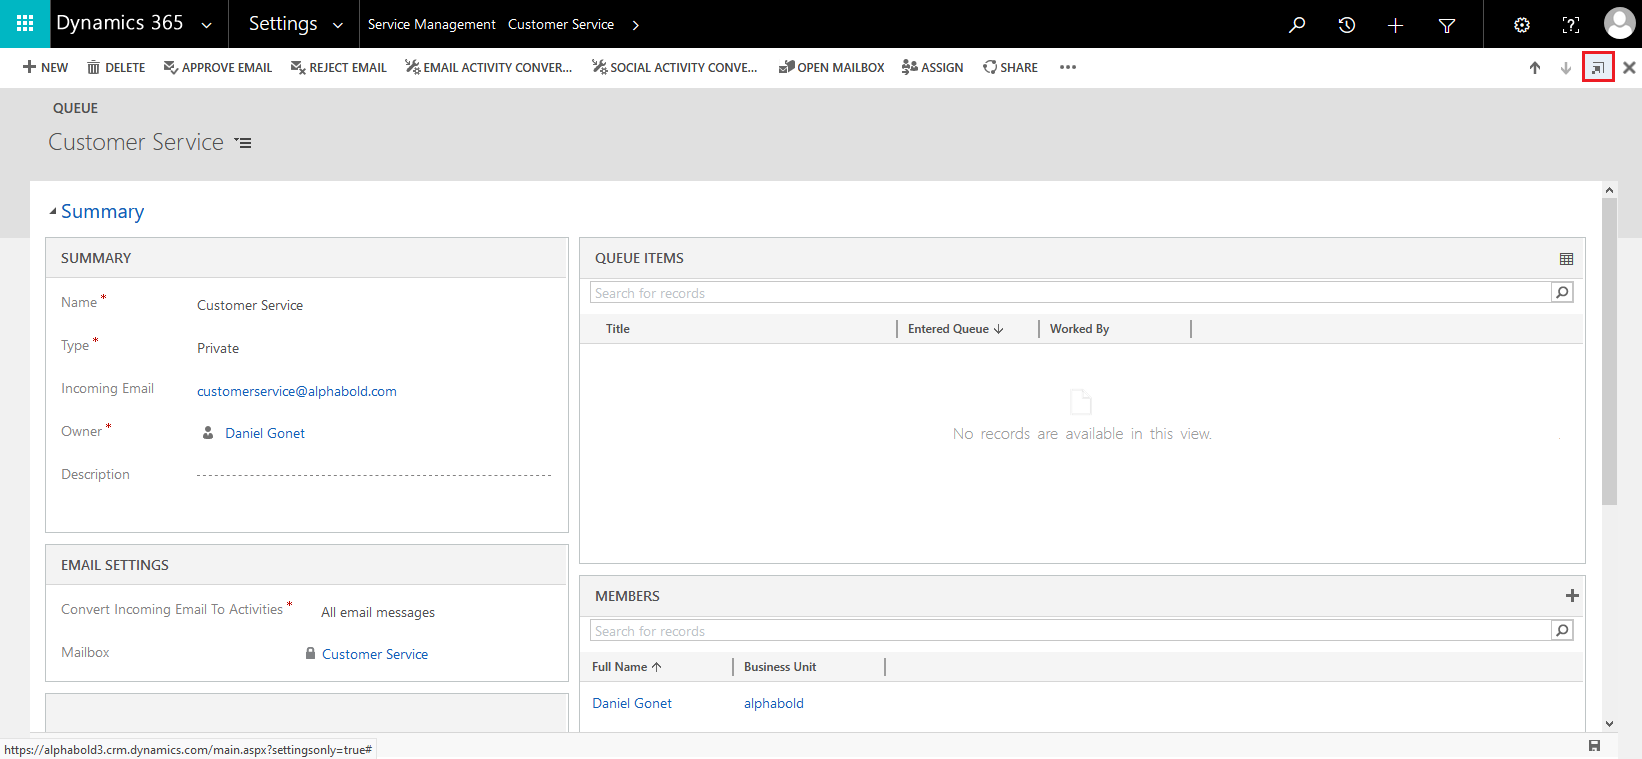
- You need to have a basic understanding of how to access and modify configuration settings like form properties.
With that out of the way, let’s dive into the first of our approaches, a real-time workflow.
Read more about Streamlining Your Workflow: Automation Features Of Dynamics 365
A Real-Time Workflow:
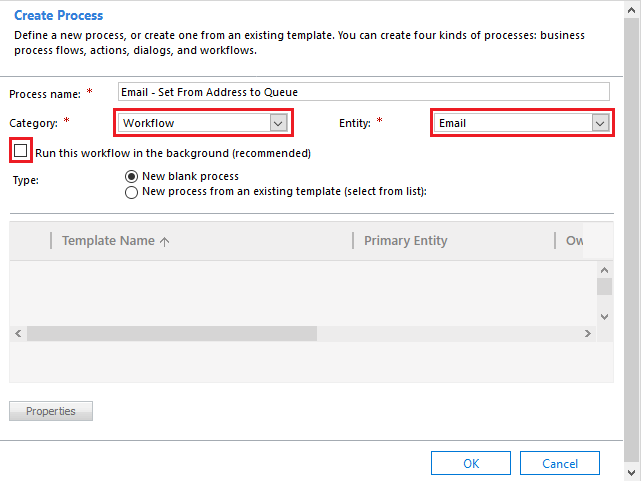
Create a new workflow with the following settings:
- Category: Workflow
- Entity: Email
- Run this workflow in the background unchecked
-
- This is critical because we want to make sure that the From address is changed before the email is sent.
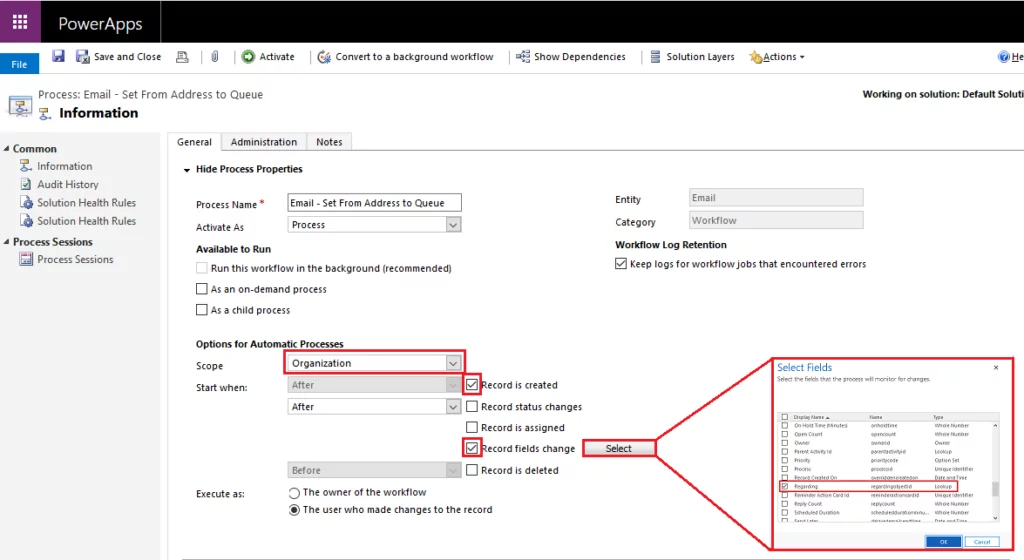
Configure the workflow’s trigger behavior:
- Set an appropriate Scope. I want this workflow to run for anyone in the organization so I have chosen Organization, but Business Unit or Parent: Child Business Unit is also valid if this behavior should be more specific.
- Record is created checked
- Record fields change checked
- Click the Select button and select Regarding. This will allow the workflow to run if a saved email gets assigned to a case, in addition to when it’s created.
Configure the workflow’s logic as per the following:
- This will check to confirm that the email is open, outgoing, and regarding a case. Then, update the email form.

Click on the Set Properties button in the Update: Email step, and enter the queue in the From field lookup:

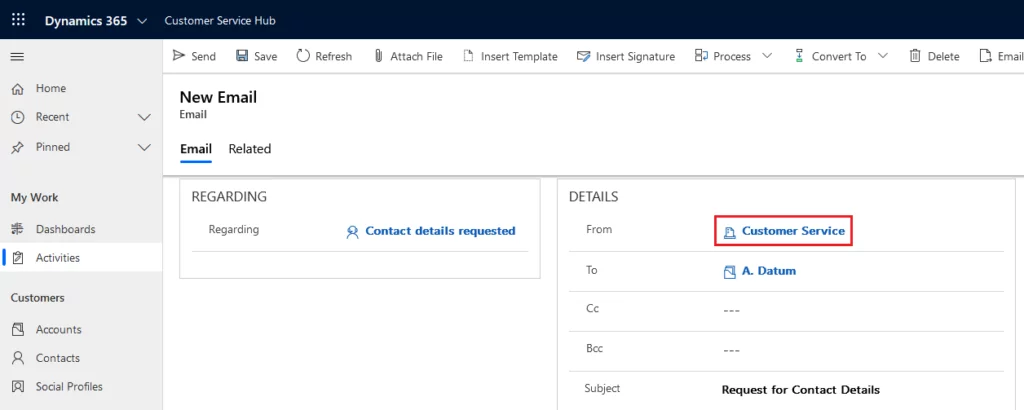
Save and publish the workflow. Now, when users will create email records from the Timeline on a case, the email will automatically be set to come from Customer Service when:
The workflow strategy should be appropriate for most use cases, but there are some potential scenarios in which JavaScript is the preferable option. Here is the process for building the same functionality we saw with the workflow, but with JavaScript instead:
Custom JavaScript:
Get the queue name and GUID for the queue you’d like added in the From:
- To get the GUID, open the queue record and click on the Pop-out this form button at the upper right:
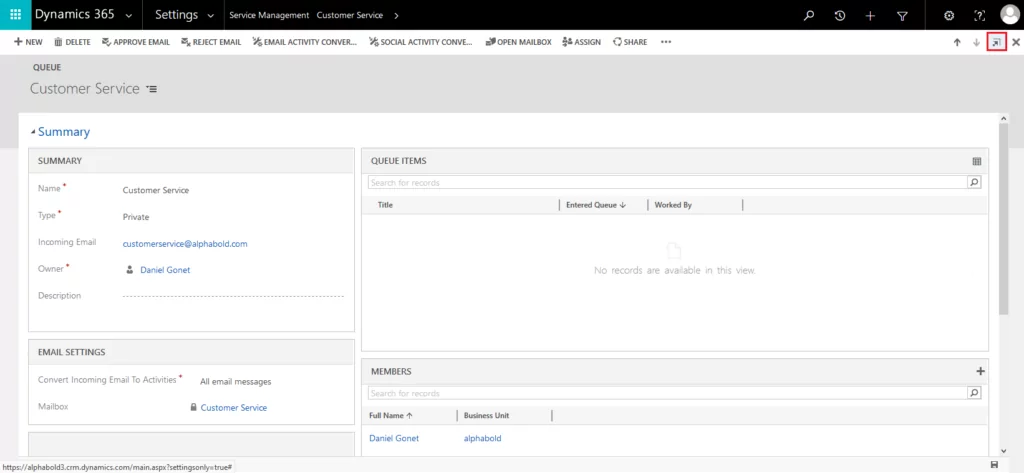
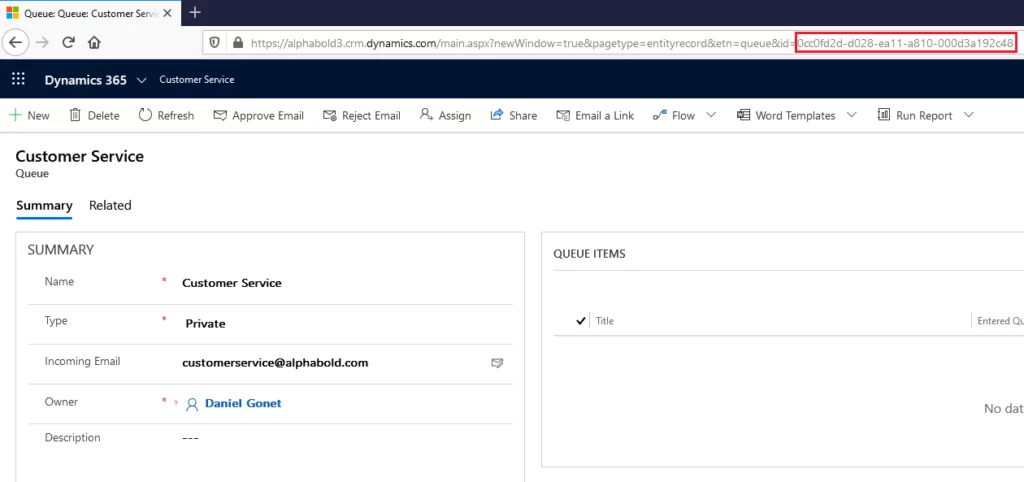
Copy the queue & re Pass execution context:
- ID value from the URL and store it for later:
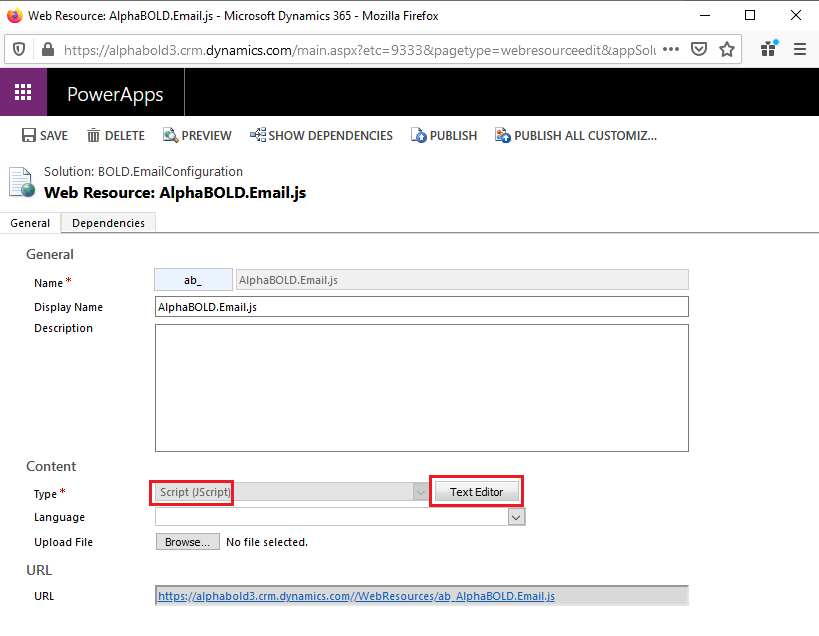
Create a new web resource with the following settings:
- Type: Script (Jscript)
Copy the following script into a text editor like Notepad or Visual Studio Code:
function setFromAddressToQueue (executionContext) { const formContext = executionContext.getFormContext(); const regardingObject = formContext.getAttribute(“regardingobjectid”).getValue(); const emailStatus = formContext.getAttribute(“statecode”).getValue(); const emailDirection = formContext.getAttribute(“directioncode”).getValue(); // if email is regarding a case if (regardingObject && regardingObject[0].entityType === “incident”) { // if email status is open and direction is outgoing if (emailStatus === 0 && emailDirection === true) { // build the lookup object const queueLookup = [ { id: “xxxxxxxx-xxxx-xxxx-xxxx-xxxxxxxxxxxx”, name: “Queue Name”, entityType: “queue” } ]; // set the from field to the appropriate queue formContext.getAttribute(“from”).setValue(queueLookup); } } }
Modify the script, pasting the GUID and queue name into to the queueLookup object:
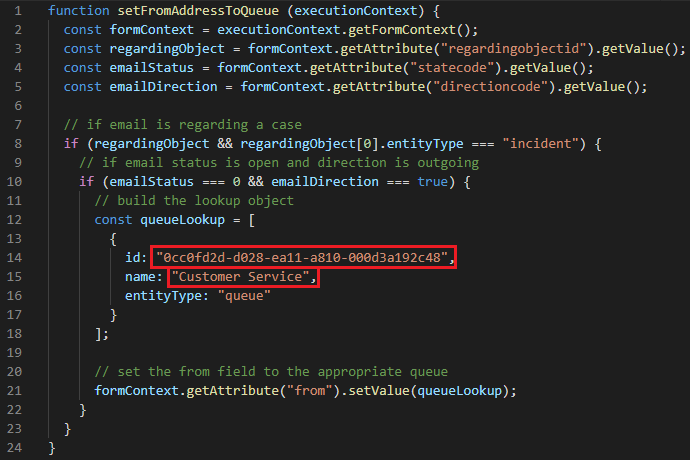
Copy this script and paste it into the text editor for the new web resource:
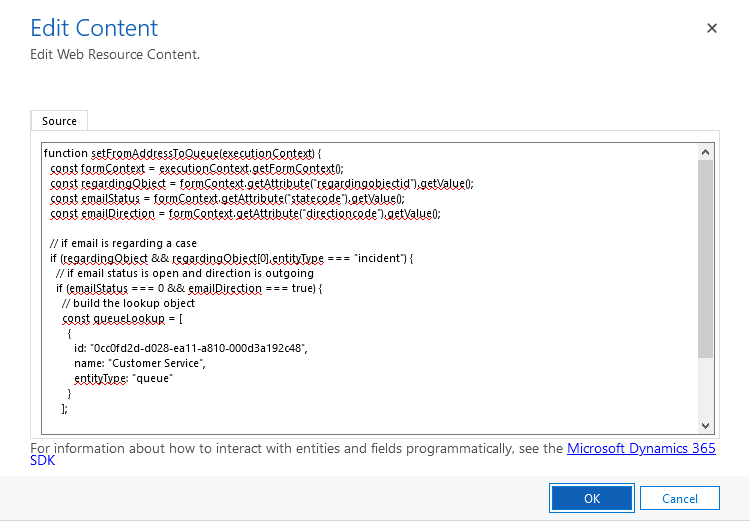
- Save and publish the web resource.
- Navigate to the main email form being used in your organization.
-
- This form will be called “Email for interactive experience” by default if using Unified Interface, as of version 9.1.
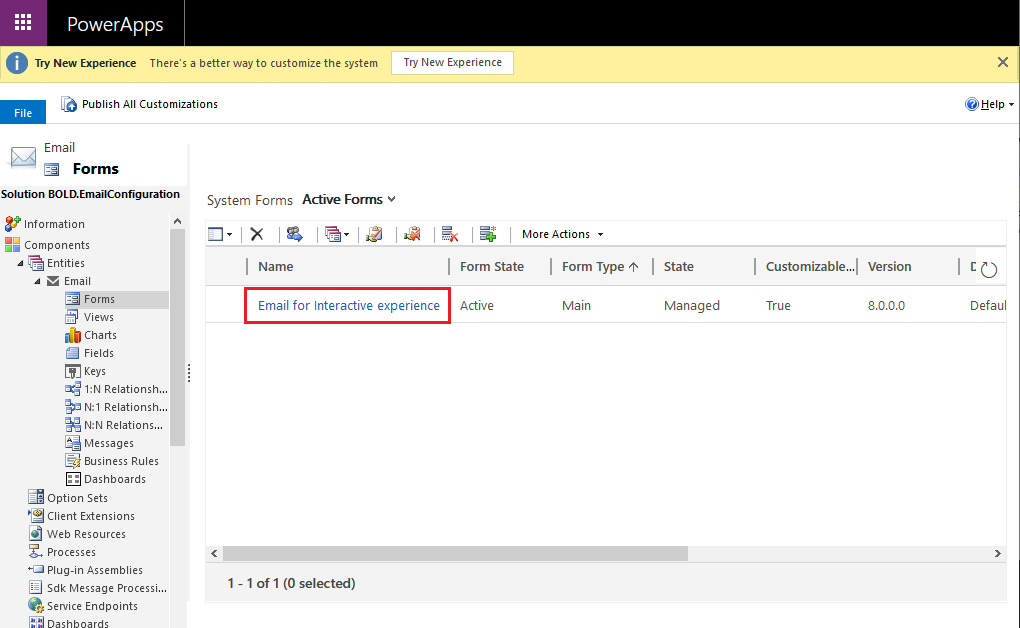
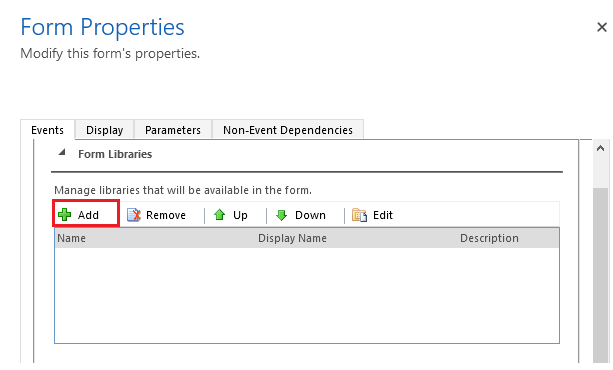
Open the form properties window and add the web resource as a form library:
Add the function to the following areas:
- Control: Form | Event: OnLoad
- Make sure the Pass execution context as the first parameter is checked. The script will not work without this selected, as it needs the execution context to get the required data.
- Control: Regarding | Event: OnChange
- Make sure the Pass execution context as the first parameter is checked. The script will not work without this selected, as it needs the execution context to get the required data.
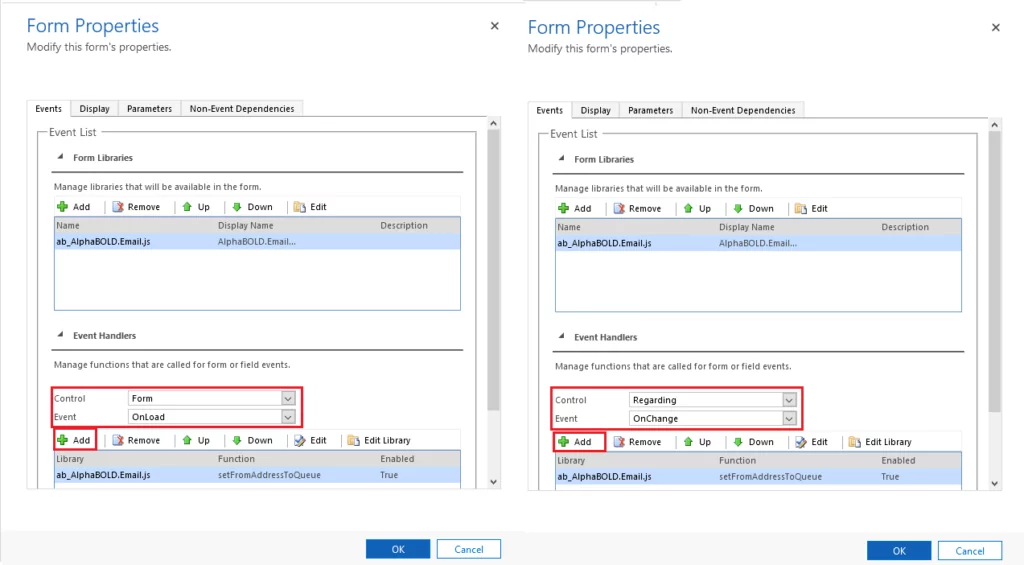
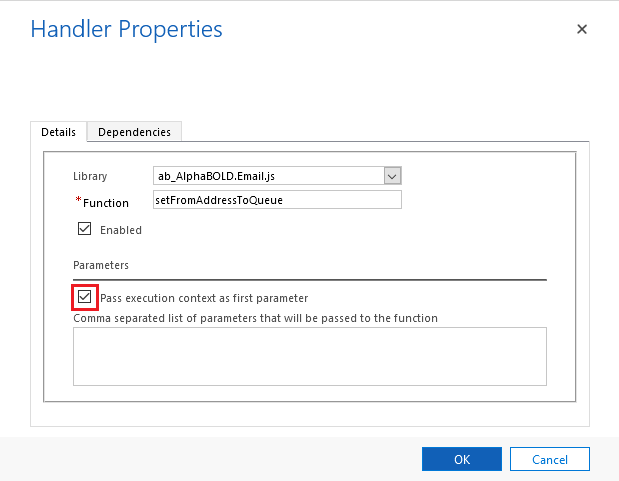
Save and publish the email form. Now, when users create email records from the Timeline on a case, the email will automatically be set to come from Customer Service immediately when the email record is opened, even before saving:
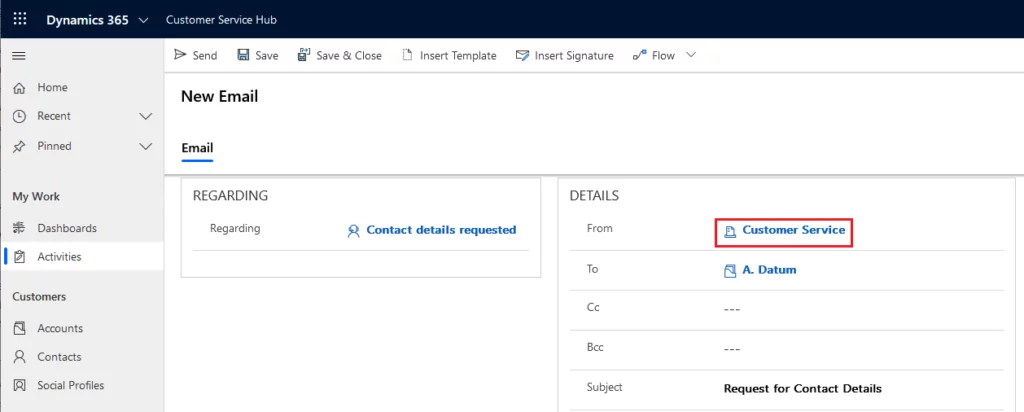
As with most Dynamics modifications, the tradeoff between the workflow approach and custom JavaScript is that the former will be more robust due to using out of the box configurations and the latter will be more customizable. In this particular example, the workflow will not change the From address when the email form is loaded, only when the email is saved or sent. However, the JavaScript will handle this on load, which can make it more intuitive for users. Regardless of which method is used, the result is the same.
Transform Your Operations with AlphaBOLD’s Dynamics 365 Expertise
Maximize the efficiency and productivity of your business with AlphaBOLD's tailored Dynamics 365 solutions.
Request a DemoConclusion
Explore Recent Blog Posts


