I recently implemented a functionality for one of our clients where they wanted help documents for each entity to be linked up to that entity. Help documents would reside in SharePoint and on ribbon button click the help document would open up. I documented that change and now I will just post the documentation here. I am sure it will help many interested in creating custom ribbons.
Help Documents – SharePoint
Custom Ribbons are created to link each entity with corresponding help document on the SharePoint site. Each entity that has a relevant help document available on SharePoint is linked via ribbon button. The purpose of the change is to allow users to get process related help on record creation for the entity that has help ribbon buttons.
Explore Our Microsoft Dynamics 365 Services
Architecture
The overall architecture of this change is to link up each entity creation form in CRM with a custom page using ribbon button. This Custom page would open up the relevant help document on the SharePoint site based on entity on which the action was performed.
Implemented Solution
Here is the complete overview of the implemented solution:
Custom Ribbon
1. Generate ribbon Xml for all the ribbons in CRM using the sample provided in SDK. The location is provided in the document.
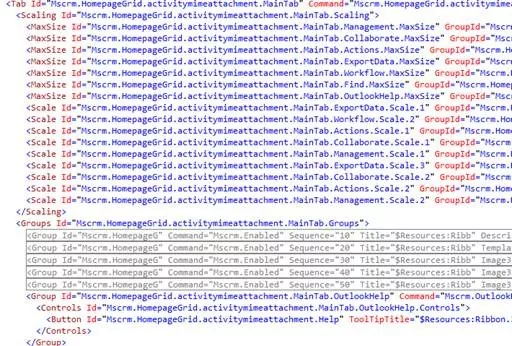
2. Ribbon Xml contains all the Groups for different entities. Each tab has all the groups and Scaling and Maxsize value of each group.
3. Under the tab identify the group where you want to add another group as shown in the figure below:
4. Based on the structure in the generated ribbon Xml it is easy to create custom ribbon with the location and name. As part of this change we will create the group called “Help Group”.
5. Groups are added under the “CommandUIDefinition” section where the look and feel of Group and buttons inside the group is defined.
<RibbonDiffXml>
<CustomActions>
<CustomAction Id=”Mscrm.Form.account.MainTab.CustomGroup.CustomAction”
Location=”Mscrm.Form.account.MainTab.Groups._children”
Sequence=”110″>
<CommandUIDefinition>
<Group Id=”Mscrm.Form.account.MainTab.CustomGroup.CustomHelpGroup”
Command=”Mscrm.Form.account.MainTab.CustomGroup.Command”
Sequence=”51″
Title=”Help Group”
Description=”$Resources(EntityDisplayName):Help document link”
Template=”Mscrm.Templates.Flexible2″>
6. The ‘Sequence’ in the Group tag defines where the group will appear on the CRM Entity Form.
7. Once we have added the Group then we add the buttons:
<Group Id=”Mscrm.Form.account.MainTab.CustomGroup.CustomHelpGroup”
Command=”Mscrm.Form.account.MainTab.CustomGroup.Command”
Sequence=”51″
Title=”Help Group”
Description=”$Resources(EntityDisplayName):Help document link”
Template=”Mscrm.Templates.Flexible2″>
<Controls Id=”Mscrm.Form.account.MainTab.CustomGroup.Controls”>
<Button Id=”Mscrm.Form.account.MainTab.CustomGroup.HelpButton”
Command=”Mscrm.Form.account.MainTab.CustomGroup.HelpButton.Command”
Sequence=”10″
LabelText=”Xxx Help”
Image16by16=”$webresource:xxx_HelpIcon16x16″
Image32by32=”$webresource:xxx_HelpIcon32x32″
ToolTipTitle=”Help document for users”
ToolTipDescription=”This button opens up the help document.”
TemplateAlias=”o1″ />
</Controls>
</Group>
8. Under the button we define the Command that executes once the button is clicked. The action that is performed on the button Click is then defined in the ‘CommandDefinition’ section.
<CommandDefinitions>
<CommandDefinition Id=”Mscrm.Form.account.MainTab.CustomGroup.HelpButton.Command”>
<EnableRules/>
<DisplayRules/>
<Actions>
<Url Address=”$webresource:xxx_OpenXxxHelpEntityDocument” PassParams=”true”/>
</Actions>
</CommandDefinition>
<CommandDefinition Id=”Mscrm.Form.account.MainTab.CustomGroup.Command”>
<EnableRules>
<EnableRule Id=”Mscrm.Enabled”/>
</EnableRules>
<DisplayRules/>
<Actions/>
</CommandDefinition>
9. Similarly under the “Custom Actions” section we define other ‘CustomAction’ for MaxSize and Scaling.
<CustomActions>
<CustomAction Id=”Mscrm.Form.account.MainTab.CustomGroup.MaxSize.CustomAction”
Location=”Mscrm.Form.account.MainTab.Scaling._children”
Sequence=”120″>
<CommandUIDefinition>
<MaxSize Id=”Mscrm.Form.account.MainTab.CustomGroup.MaxSize”
GroupId=”Mscrm.Form.account.MainTab.CustomGroup.CustomHelpGroup”
Sequence=”21″
Size=”LargeLarge” />
</CommandUIDefinition>
</CustomAction>
<CustomAction Id=”Mscrm.Form.account.MainTab.CustomGroup.Popup.CustomAction”
Location=”Mscrm.Form.account.MainTab.Scaling._children”
Sequence=”140″>
<CommandUIDefinition>
<Scale Id=”Mscrm.Form.account.MainTab.CustomGroup.Popup”
GroupId=”Mscrm.Form.account.MainTab.CustomGroup.CustomHelpGroup”
Sequence=”85″
Size=”Popup” />
</CommandUIDefinition>
</CustomAction>
</CustomActions>
10. Once we have created the Custom Ribbon we will add the ‘RibbonDiffXml’ to Customizations exported from CRM.
Learn more about our Microsoft Dynamics 365 Services
Adding Custom Ribbon to Solution
1. In order to add Custom Ribbon created above to the entity we need to first of all create a Solution in CRM and add the desired entity to that solution.
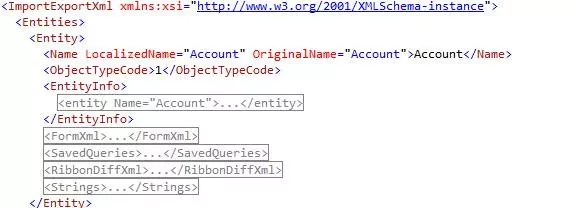
2. Export that solution and open up the ‘Customization.xml’ file.
3. Each entity that supports Custom Ribbons would contain the ‘RibbonDiffXml’ tag that needs to be replaced with the Custom Ribbon that we created.
4. Once we have added our ‘Custom Ribbon’ to the FormXml we can zip the Customizations.xml to make it part of the Solution and on importing that solution in CRM our changes will start appearing on the entity for which we have added the Custom Ribbon.
5. Here is the complete Ribbon Xml for ‘Account Entity’
<RibbonDiffXml>
<CustomActions>
<CustomAction Id=”Mscrm.Form.account.MainTab.CustomGroup.CustomAction”
Location=”Mscrm.Form.account.MainTab.Groups._children”
Sequence=”110″>
<CommandUIDefinition>
<Group Id=”Mscrm.Form.account.MainTab.CustomGroup.CustomHelpGroup”
Command=”Mscrm.Form.account.MainTab.CustomGroup.Command”
Sequence=”51″
Title=”Help Group”
Description=”$Resources(EntityDisplayName):Help document link”
Template=”Mscrm.Templates.Flexible2″>
<Controls Id=”Mscrm.Form.account.MainTab.CustomGroup.Controls”>
<Button Id=”Mscrm.Form.account.MainTab.CustomGroup.HelpButton”
Command=”Mscrm.Form.account.MainTab.CustomGroup.HelpButton.Command”
Sequence=”10″
LabelText=”Xxx Help”
Image16by16=”$webresource:xxx_HelpIcon16x16″
Image32by32=”$webresource:xxx_HelpIcon32x32″
ToolTipTitle=”Help document for users”
ToolTipDescription=”This button opens up the help document.”
TemplateAlias=”o1″ />
</Controls>
</Group>
</CommandUIDefinition>
</CustomAction>
<CustomAction Id=”Mscrm.Form.account.MainTab.CustomGroup.MaxSize.CustomAction”
Location=”Mscrm.Form.account.MainTab.Scaling._children”
Sequence=”120″>
<CommandUIDefinition>
<MaxSize Id=”Mscrm.Form.account.MainTab.CustomGroup.MaxSize”
GroupId=”Mscrm.Form.account.MainTab.CustomGroup.CustomHelpGroup”
Sequence=”21″
Size=”LargeLarge” />
</CommandUIDefinition>
</CustomAction>
<CustomAction Id=”Mscrm.Form.account.MainTab.CustomGroup.Popup.CustomAction”
Location=”Mscrm.Form.account.MainTab.Scaling._children”
Sequence=”140″>
<CommandUIDefinition>
<Scale Id=”Mscrm.Form.account.MainTab.CustomGroup.Popup”
GroupId=”Mscrm.Form.account.MainTab.CustomGroup.CustomHelpGroup”
Sequence=”85″
Size=”Popup” />
</CommandUIDefinition>
</CustomAction>
</CustomActions>
<Templates>
<RibbonTemplates Id=”Mscrm.Templates”></RibbonTemplates>
</Templates>
<CommandDefinitions>
<CommandDefinition Id=”Mscrm.Form.account.MainTab.CustomGroup.HelpButton.Command”>
<EnableRules/>
<DisplayRules/>
<Actions>
<Url Address=”$webresource:xxx_OpenXxxHelpEntityDocument” PassParams=”true”/>
</Actions>
</CommandDefinition>
<CommandDefinition Id=”Mscrm.Form.account.MainTab.CustomGroup.Command”>
<EnableRules>
<EnableRule Id=”Mscrm.Enabled”/>
</EnableRules>
<DisplayRules/>
<Actions/>
</CommandDefinition>
</CommandDefinitions>
<RuleDefinitions>
<TabDisplayRules />
<DisplayRules />
<EnableRules />
</RuleDefinitions>
<LocLabels />
</RibbonDiffXml>
Custom Ribbon Action
1. Now that we have the ribbon in place we need to define what action we want to perform on button click.
2. In the Custom Ribbon we have following actions defined
<Actions>
<Url Address=”$webresource:xxx_OpenXxxHelpEntityDocument” PassParams=”true”/>
</Actions>
3. This means that on button Click “xxx_OpenXxxHelpEntityDocument” resource will be instantiated and it will be passed the default parameters like ‘entitytypecode’.
4. We will add our custom ‘html’ page as a resource so that our page is launched on the button click.
5. The functionality to open up the Xxx Help Document is part of the Html Page.
Custom Page Opening Help Documents
1. Custom Html Page uses following scripts:
a. JSON
b. Rest library
c. MetaData
2. Custom Page receives the entitytypecode from the Custom Ribbon button and based on that it generates the documents name.
3. Custom page creates the URL for the document by fetching Absolute site URL of the SharePoint site from the ‘SharePointSite’ record. Name of the site containing the Absolute Url has to be ‘Default Site Collection’.
4. Custom Page appends the Relative Url of the SharePoint site by fetching it from the ‘SharePointSite’. This Relative Url is picked from the site that is tagged as ‘Default’ site.
5. In addition Custom Page appends the SharePoint library ‘Relative Url’ by fetching it from the ‘SharePointDocumentLocation’. The name of the record containing this Relative Url has to be ‘CRM_HELP_Docs’.
6. Custom page appends the name of the document after fetching the display name using the ‘Metadata’ library based on the ‘entitytypecode’ received in the parameters sent by Custom Ribbon. The name of the document has the convention “Xxx_Help_EntiydisplayName”.
7. In case any one of these sites or library locations are missing Custom Page will throw an exception.
Error Handling
1. In case of any exception the window opened on Ribbon button click closes and the error message is displayed to the users
Deployment
Here are the deployment steps for this solution
Deployment using the Solution added to Project
1. Project already contains the solution for the entities that are part of the initial scope. In order to deploy this solution just import ‘XxxCustomHelpRibbon_1_0_0_0.zip’ file in the organization.
2. This is the unmanaged solution so in order to deploy on machines where the roll back is desired please do not use this method to deploy the solution.
Deploying using the Solution in CRM
1. XxxDev contain the ‘XxxCustomHelpRibbon’ solution. In order to deploy this solution on other environments just export this solution in ‘managed solution’ mode and import that solution in the desired environment.
If you have any question or queries, do not hesitate to reach out to us!


