Introduction
In the field of machine learning, automating the deployment of models is crucial to ensure smooth and efficient operations. Azure provides a robust suite of services that can help streamline the end-to-end deployment process. This blog post will explore how to automate ML model deployment using Azure ML Workspace, Container Instances, and Azure DevOps.
The basic steps for training and deploying models using Azure ML are as follows:
- Create an Azure ML workspace to manage machine learning assets.
- Prepare data by cleaning, transforming, and pre-processing it.
- Train a model using various tools and algorithms provided by Azure ML.
- Evaluate and optimize the model for better accuracy.
- Deploy the model to a production environment for inference using various deployment options provided by Azure ML.
- Monitor and manage the model over time using Azure Monitor and Azure ML Model Management.
Azure Container Instances (ACI)
We can use Azure container instance service (ACI) for deploying our models as container images. Having the model deployments as a container helps automate the model deployment process to handle model active learning through feedback and scalability to handle the incoming model request.
Deployment Steps:
- To deploy a machine learning model to ACI, package your model and its dependencies into a container image.
- Then, create an ACI resource in Azure and deploy the container image.
- You can test the web service by sending HTTP requests to the endpoint URL and managing the ACI resource using the Azure portal or Azure CLI.
- ACI is a convenient option for deploying machine learning models as web services without managing the infrastructure.
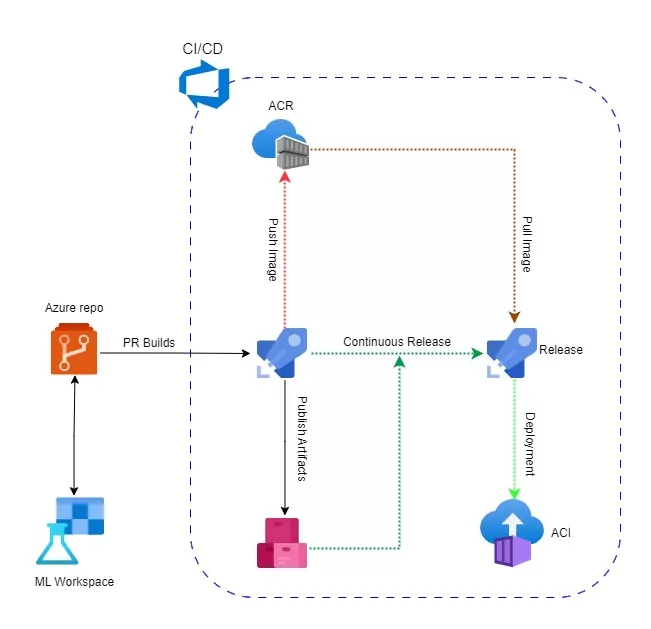
Automate Models deployment from ML workspace to a container instance using Azure DevOps
Since our model is trained and registered in the ML workspace, we only need to automate the deployment from the workspace to a container instance.
Create a new Azure DevOps Project:
- Go to the Azure DevOps portal and create a new project.
- Choose the appropriate project settings and repository type.
Define the deployment pipeline:
- Navigate to Pipelines in Azure DevOps and create a new pipeline.
- Select your preferred repository and configure the pipeline settings.
- Choose a YAML-based pipeline for more flexibility and version control.
Build stage:
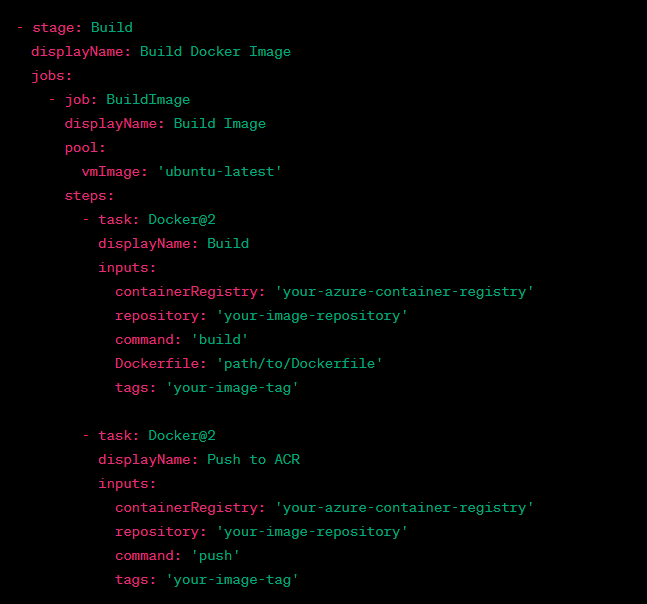
- In the pipeline YAML file, define a build stage to build the Docker image.
- Specify the Dockerfile that sets up the environment and dependencies.
- Use Azure ML base image as the starting point.
- Copy the model artifacts and deployment script into the image.
- Build the Docker image and tag it with the ACR registry details.
- Add a task in the pipeline YAML file to push the built Docker image to ACR.
- Use Azure CLI or Azure PowerShell task with appropriate authentication.
- Specify the ACR details, such as registry name and login credentials.
The Docker file will look something like this:
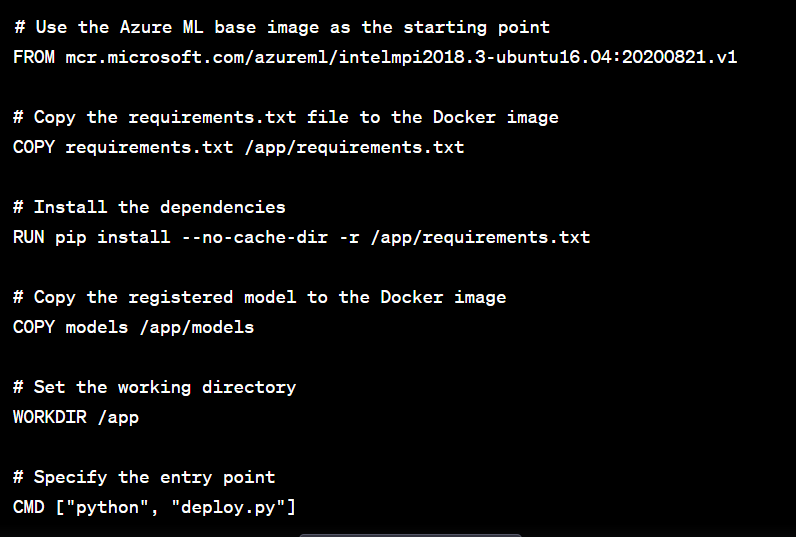
In this Dockerfile, the dependencies are installed, the registered model is copied, the working directory is set, and the entry point command is specified. Adjust the paths and dependencies according to your project requirements.
Save the above Dockerfile in your project directory, and you can use it as the basis for building your Docker image that includes the registered model.
After the Docker file is ready, the build pipeline will look something like this:
Deploy to ACI:
- Add a task in the pipeline YAML file to deploy the Docker image to ACI.
- Use Azure CLI or Azure PowerShell task with appropriate authentication.
- Specify the ACI details, such as resource group, container name, and image details.
- Set the required CPU and memory resources, network settings, and environment variables.
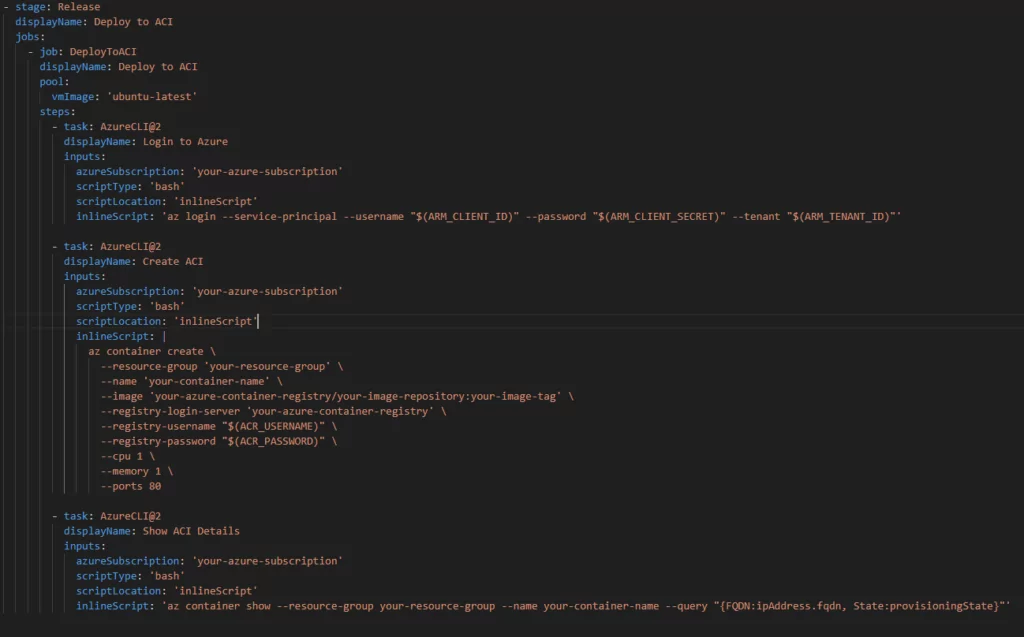
In this example, the Release stage includes a “ DeployToACI “ job responsible for deploying the Docker image to ACI. Here are the key steps:
Login to Azure:
- Uses the Azure CLI task to log in to Azure using service principal credentials.
- Replace ‘your-azure-subscription’, ARM_CLIENT_ID, ARM_CLIENT_SECRET, and ARM_TENANT_ID with appropriate values.
Create ACI:
- Uses the Azure CLI task to create an Azure Container Instance.
- Replace ‘your-azure-subscription’, ‘your-resource-group’, ‘your-container-name’, ‘your-azure-container-registry/your-image-repository:your-image-tag’, ACR_USERNAME, and ACR_PASSWORD with appropriate values.
- Specifies CPU, memory, and port settings according to your requirements.
Show ACI Details:
- Uses the Azure CLI task to display the details of the deployed ACI instance.
- Replace ‘your-azure-subscription’, ‘your-resource-group’, and ‘your-container-name’ with appropriate values.
Conclusion
In conclusion, we have explored the efficient automation of model deployment using Azure ML Workspace, Container Instances, and Azure DevOps. By leveraging the capabilities of Azure ML Workspace, you can easily register and track your models, ensuring seamless management. With the flexibility provided by Container Instances, deploying containerized applications becomes hassle-free, freeing you from the complexities of infrastructure management.
Azure DevOps is pivotal in enabling CI/CD pipelines and streamlining the entire deployment process. We have covered essential steps such as building Docker images, pushing them to Azure Container Registry (ACR), and deploying them to ACI. Through this automation, you can achieve streamlined deployment, maintain consistency, and pave the way for scalable solutions. Embrace the power of automation and unlock the full potential of your deployment endeavors.
Explore Recent Blog Posts


