Table of Contents
Introduction
Are you looking for a simple and extensible no-code solution for handling approvals in Power Apps? Perhaps you have built automation within Power Automate and want to provide a mechanism to “gate” or confirm your process before it executes. It can also benefit situations like managing quotes in Dynamics Customer Engagement, where you want your sales manager to review and approve quotes before sending them to clients.
This article shows you how to create custom approvals using Power Automate/Flows, Teams, and Adaptive Cards.
But first, let’s explore what Adaptive Cards are.
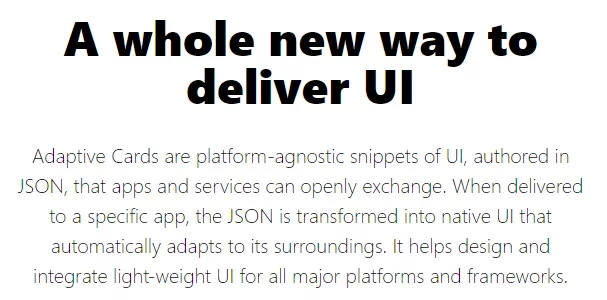
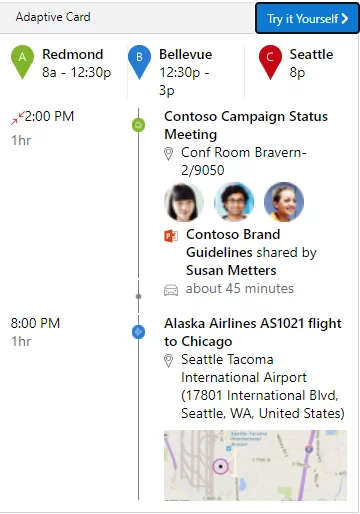
What are Adaptive Cards?
Adaptive Cards enable the integration of custom user interface elements into web applications or platforms capable of rendering HTML, such as Outlook and Teams. This feature enhances user experience by providing additional information and interactivity, especially in approval scenarios. In a practical application, we can create a straightforward model within Dataverse to track approval activities. Following this, we can design an Adaptive Card to notify users in Microsoft Teams about any pending approvals they may have.
Create a Custom Power Apps Approval
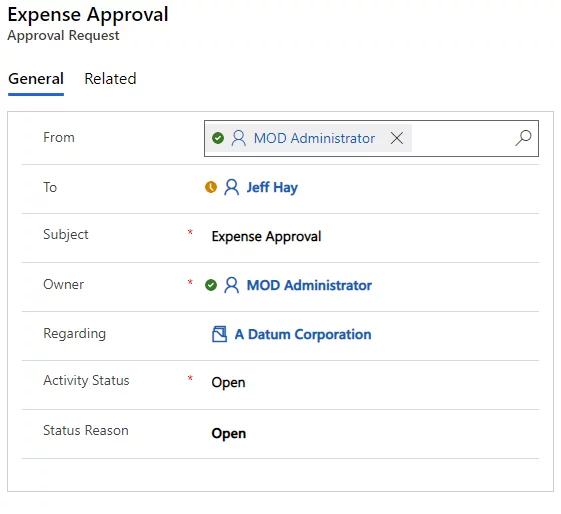
Let’s start by creating a Power Apps approval activity. As needed, it can be customized with additional attributes.
Further Reading: Dataflows In Power BI
Build an Approval Flow
The next step involves creating a Flow using the trigger when a record is created, updated, or deleted. This process will retrieve the approval request record containing essential details, including the sender, recipient, and related records. This information will later be utilized in the Adaptive Card and Teams.
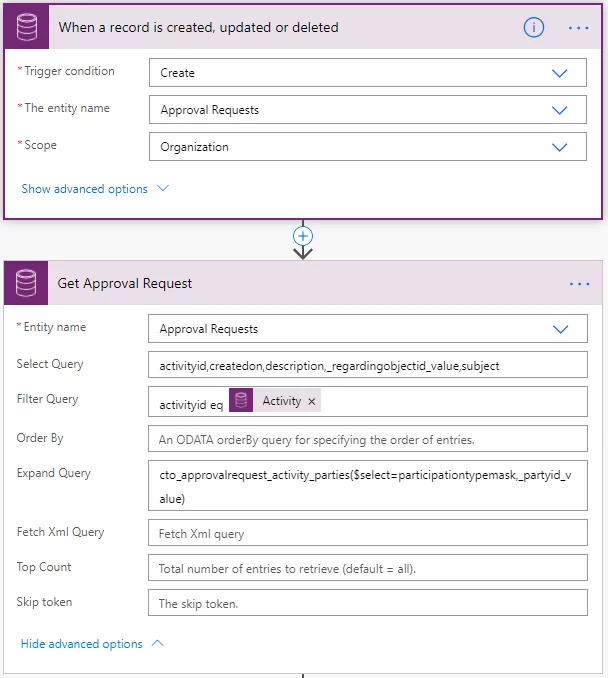
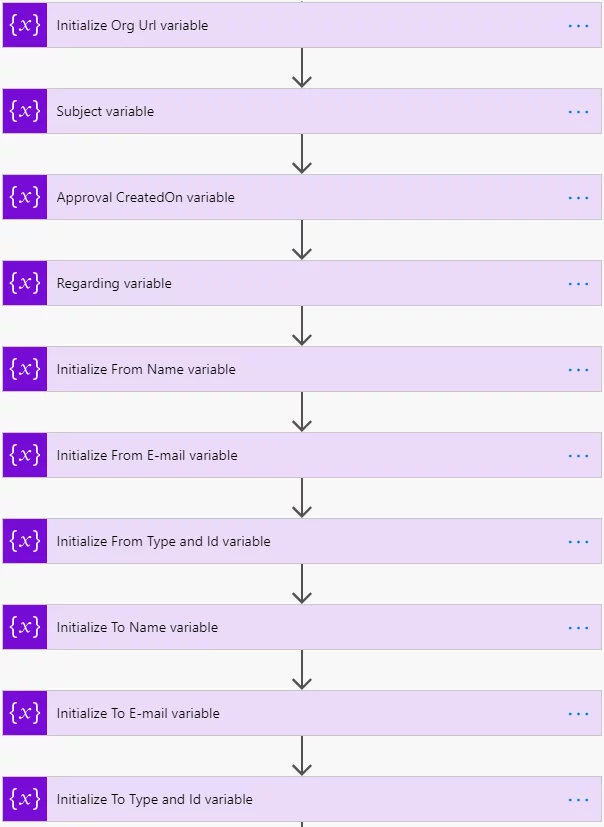
Additionally, some variables will be initialized to store the values incorporated into the Adaptive Card.
Streamline Approvals in Power Apps with AlphaBOLD
Our services are tailored to improve your Power apps approval and increase productivity.
Request a DemoSetting Variables for Approval Requests
In the initial steps, we will initialize the variables with the respective ‘From’ and ‘To’ values.
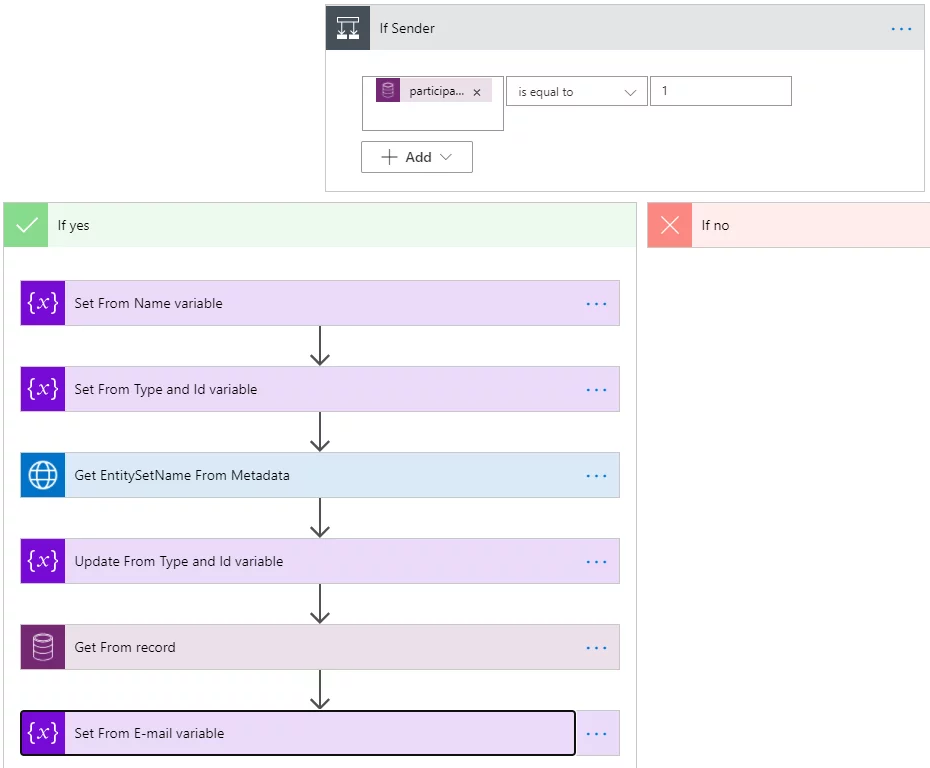
This process involves extracting information from the activity party. We will assign the formatted values to the Name variable and subsequently set the schema name and ID.
To obtain the email address, we will first call the Metadata Service to retrieve the appropriate pluralized EntitySetName.
Next, we will acquire the record’s email address based on whether it originates from a system user or a queue.
Finally, we will proceed to update the “from” email address.
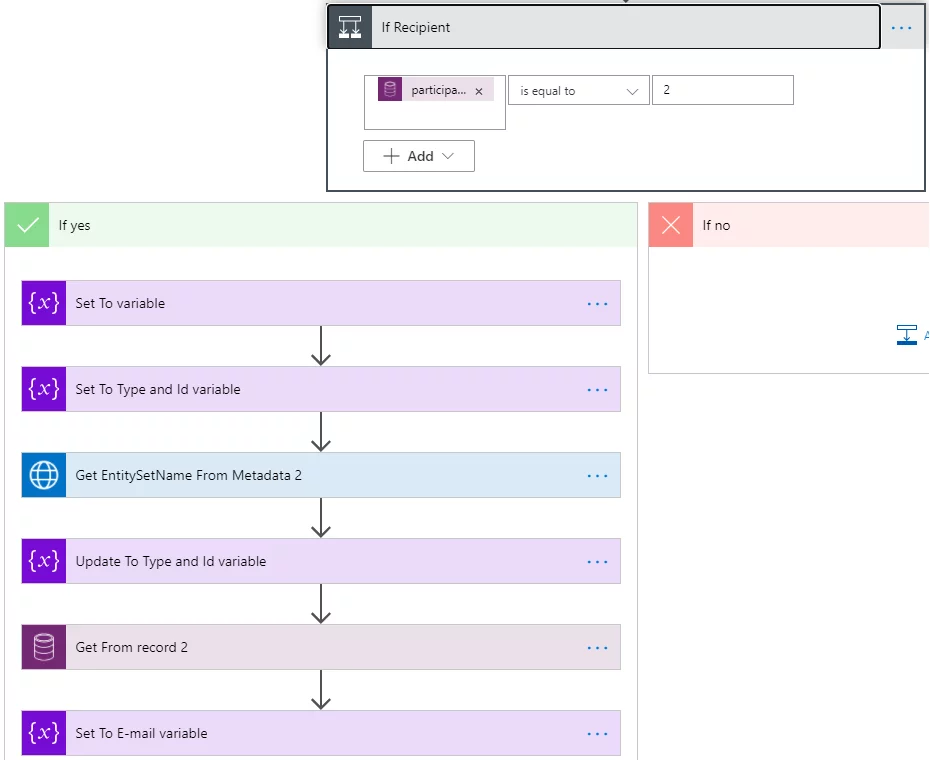
Similar steps will be repeated for the recipient:
Posting an Adaptive Card to Microsoft Teams
Now that I have all my information, I will use “Post an Adaptive Card to a Teams user and wait for a response” action.
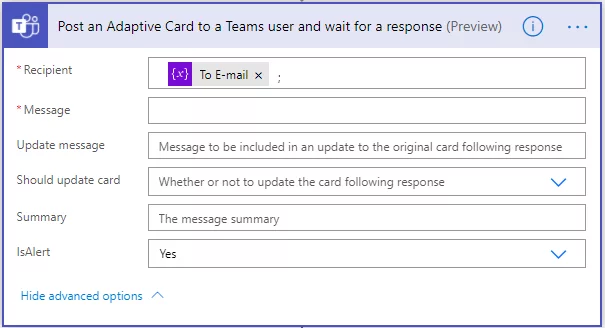
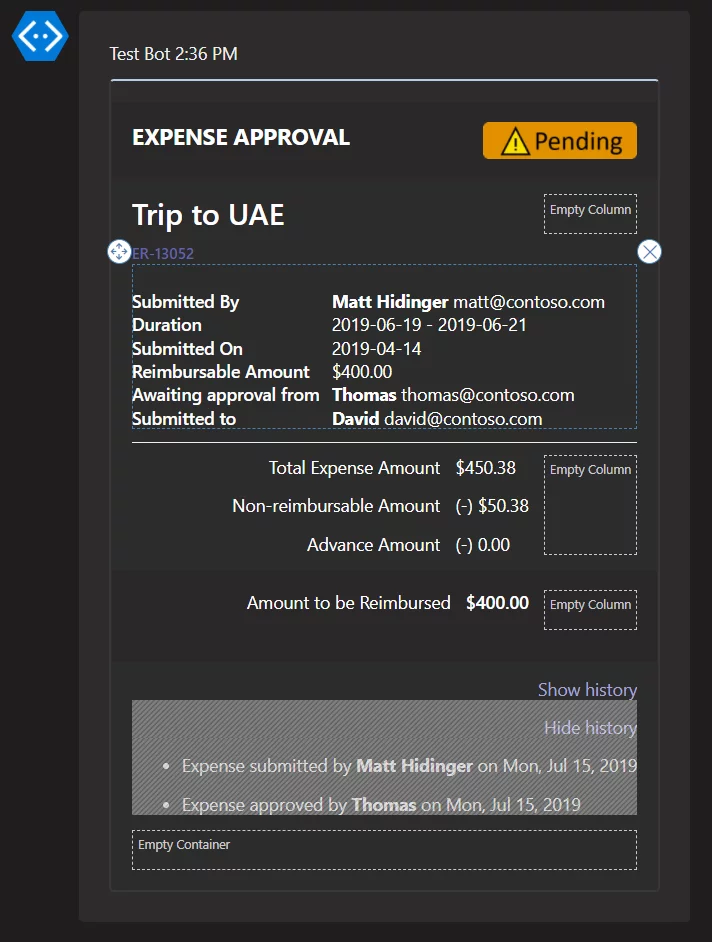
For the message field, build your adaptive card Designer | Adaptive Cards copy and insert the card payload. I am entering the information from my variables.
I’ve used Expense Report as a starting point. Once opened in the designer, switch the host app to Teams Dark mode. To keep things simple for this scenario, I’ve customized it as follows:
{
“type”: “AdaptiveCard”,
“body”: [
{
“type”: “Container”,
“style”: “emphasis”,
“items”: [
{
“type”: “ColumnSet”,
“columns”: [
{
“type”: “Column”,
“items”: [
{
“type”: “TextBlock”,
“size”: “Large”,
“weight”: “Bolder”,
“text”: “**EXPENSE APPROVAL**”,
“wrap”: true,
“style”: “heading”
}
],
“width”: “stretch”
},
{
“type”: “Column”,
“items”: [
{
“type”: “Image”,
“url”: “${status_url}”,
“altText”: “${status}”,
“height”: “30px”
}
],
“width”: “auto”
}
]
}
],
“bleed”: true
},
{
“type”: “Container”,
“items”: [
{
“type”: “ColumnSet”,
“columns”: [
{
“type”: “Column”,
“items”: [
{
“type”: “TextBlock”,
“size”: “ExtraLarge”,
“text”: “${purpose}”,
“wrap”: true,
“style”: “heading”
}
],
“width”: “stretch”
},
{
“type”: “Column”,
“width”: “auto”
}
]
},
{
“type”: “TextBlock”,
“spacing”: “Small”,
“size”: “Small”,
“weight”: “Bolder”,
“text”: “[${code}](https://adaptivecards.io)”,
“wrap”: true
},
{
“type”: “FactSet”,
“spacing”: “Large”,
“facts”: [
{
“title”: “Submitted By”,
“value”: “**${created_by_name}** ${creater_email}”
},
{
“title”: “Duration”,
“value”: “${formatTicks(min(select(expenses, x, int(x.created_by))), ‘yyyy-MM-dd’)} – ${formatTicks(max(select(expenses, x, int(x.created_by))), ‘yyyy-MM-dd’)}”
},
{
“title”: “Submitted On”,
“value”: “${formatDateTime(submitted_date, ‘yyyy-MM-dd’)}”
},
{
“title”: “Reimbursable Amount”,
“value”: “$${formatNumber(sum(select(expenses, x, if(x.is_reimbursable, x.total, 0))), 2)}”
},
{
“title”: “Awaiting approval from”,
“value”: “**${approver}** ${approver_email}”
},
{
“title”: “Submitted to”,
“value”: “**${other_submitter}** ${other_submitter_email}”
}
]
}
]
},
{
“type”: “ColumnSet”,
“spacing”: “Large”,
“separator”: true,
“columns”: [
{
“type”: “Column”,
“items”: [
{
“type”: “TextBlock”,
“horizontalAlignment”: “Right”,
“text”: “Total Expense Amount t”,
“wrap”: true
},
{
“type”: “TextBlock”,
“horizontalAlignment”: “Right”,
“text”: “Non-reimbursable Amount”,
“wrap”: true
},
{
“type”: “TextBlock”,
“horizontalAlignment”: “Right”,
“text”: “Advance Amount”,
“wrap”: true
}
],
“width”: “stretch”
},
{
“type”: “Column”,
“items”: [
{
“type”: “TextBlock”,
“text”: “$${formatNumber(sum(select(expenses, x, x.total)), 2)}”,
“wrap”: true
},
{
“type”: “TextBlock”,
“text”: “(-) $${formatNumber(sum(select(expenses, x, if(x.is_reimbursable, 0, x.total))), 2)} t”,
“wrap”: true
},
{
“type”: “TextBlock”,
“text”: “(-) 0.00 t”,
“wrap”: true
}
],
“width”: “auto”
},
{
“type”: “Column”,
“width”: “auto”
}
]
},
{
“type”: “Container”,
“style”: “emphasis”,
“items”: [
{
“type”: “ColumnSet”,
“columns”: [
{
“type”: “Column”,
“items”: [
{
“type”: “TextBlock”,
“horizontalAlignment”: “Right”,
“text”: “Amount to be Reimbursed”,
“wrap”: true
}
],
“width”: “stretch”
},
{
“type”: “Column”,
“items”: [
{
“type”: “TextBlock”,
“weight”: “Bolder”,
“text”: “$${formatNumber(sum(select(expenses, x, if(x.is_reimbursable, x.total, 0))), 2)}”,
“wrap”: true
}
],
“width”: “auto”
},
{
“type”: “Column”,
“width”: “auto”
}
]
}
],
“bleed”: true
},
{
“type”: “ColumnSet”,
“columns”: [
{
“type”: “Column”,
“verticalContentAlignment”: “Center”,
“items”: [
{
“type”: “TextBlock”,
“id”: “showHistory”,
“horizontalAlignment”: “Right”,
“color”: “Accent”,
“text”: “Show history”,
“wrap”: true
},
{
“type”: “TextBlock”,
“id”: “hideHistory”,
“horizontalAlignment”: “Right”,
“color”: “Accent”,
“text”: “Hide history”,
“wrap”: true,
“isVisible”: false
}
],
“width”: 1
}
]
},
{
“type”: “Container”,
“id”: “cardContent4”,
“isVisible”: false,
“items”: [
{
“type”: “Container”,
“items”: [
{
“type”: “TextBlock”,
“text”: “* Expense submitted by **${created_by_name}** on {{DATE(${formatDateTime(created_date, ‘yyyy-MM-ddTHH:mm:ssZ’)}, SHORT)}}”,
“isSubtle”: true,
“wrap”: true
},
{
“type”: “TextBlock”,
“text”: “* Expense ${expenses[0].status} by **${expenses[0].approver}** on {{DATE(${formatDateTime(approval_date, ‘yyyy-MM-ddTHH:mm:ssZ’)}, SHORT)}}”,
“isSubtle”: true,
“wrap”: true
}
]
}
]
},
{
“type”: “Container”
}
],
“$schema”: “http://adaptivecards.io/schemas/adaptive-card.json“,
“version”: “1.5”,
“fallbackText”: “This card requires Adaptive Cards v1.2 support to be rendered properly.”
}
Make sure to replace sample values with expressions from Power Automate variables of data from Approval Request.
Further Reading: How To Use Power Automate To Enhance Power BI
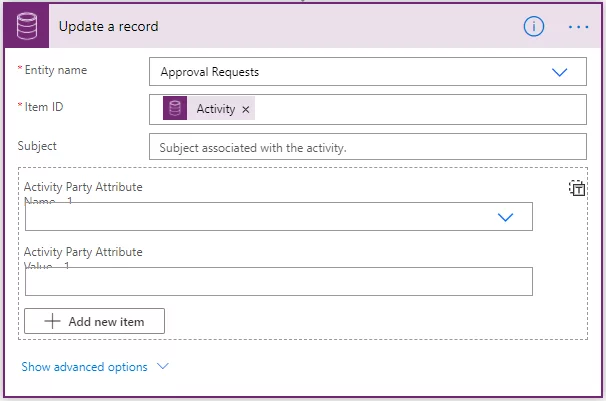
Updating Approval Status in Power Apps
Lastly, we must update the request for approvals in Power Apps. Once we get the response back from Teams action, I will use the Update a record action and update the approval activity with the appropriate Activity Status and Status Reason.
Transform your Workflow with Power Apps and Power Automate
Discover how to seamlessly integrate approvals in Power Apps using Power Automate, Teams, and Adaptive Cards with AlphaBOLD. Our specialized services are designed to enhance your business processes and workflow automation.
Request a DemoConclusion
Here is how the run looks.
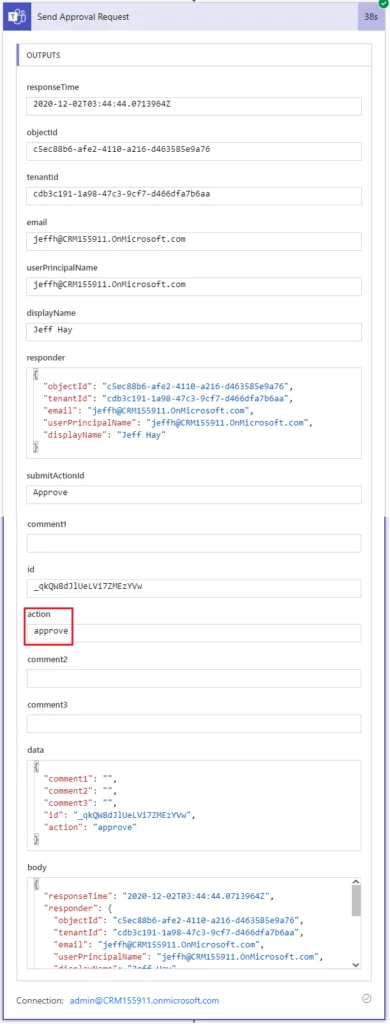
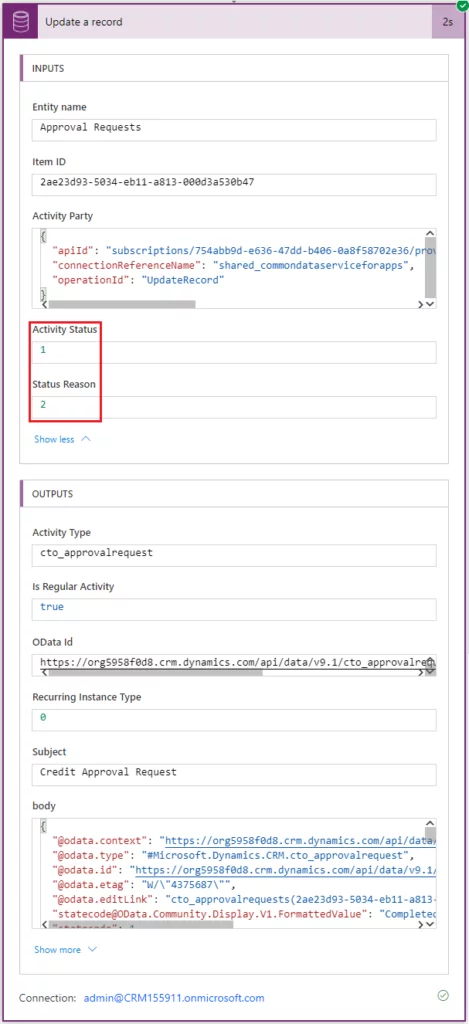
And there you have it. I hope this blog post got your creative juices flowing and showed you the power of Power Apps, Power Automate, Teams, and Adaptive Cards.
Explore Recent Blog Posts


